Child themes in WordPress are still relevant and very useful, especially when you want to make customizations without altering the parent theme directly. Here’s a guide on how to use, install, and set up a child theme:
Why Use a Child Theme?
Safe Customizations: You can make changes to a child theme without affecting the parent theme. This ensures that updates to the parent theme won’t overwrite your customizations.
Easy Maintenance: If you need to update the parent theme, your changes remain intact in the child theme.
Structured Customization: It keeps your custom code organized and separate from the theme’s core files. Check out this article to find out more about the advantages of using Child themes.
How to Install and Set Up a Child Theme in WordPress
1. Create the Child Theme Folder
Navigate to wp-content/themes on your server or in your file manager.
Create a new folder for your child theme. You might name it something like your-theme-child.
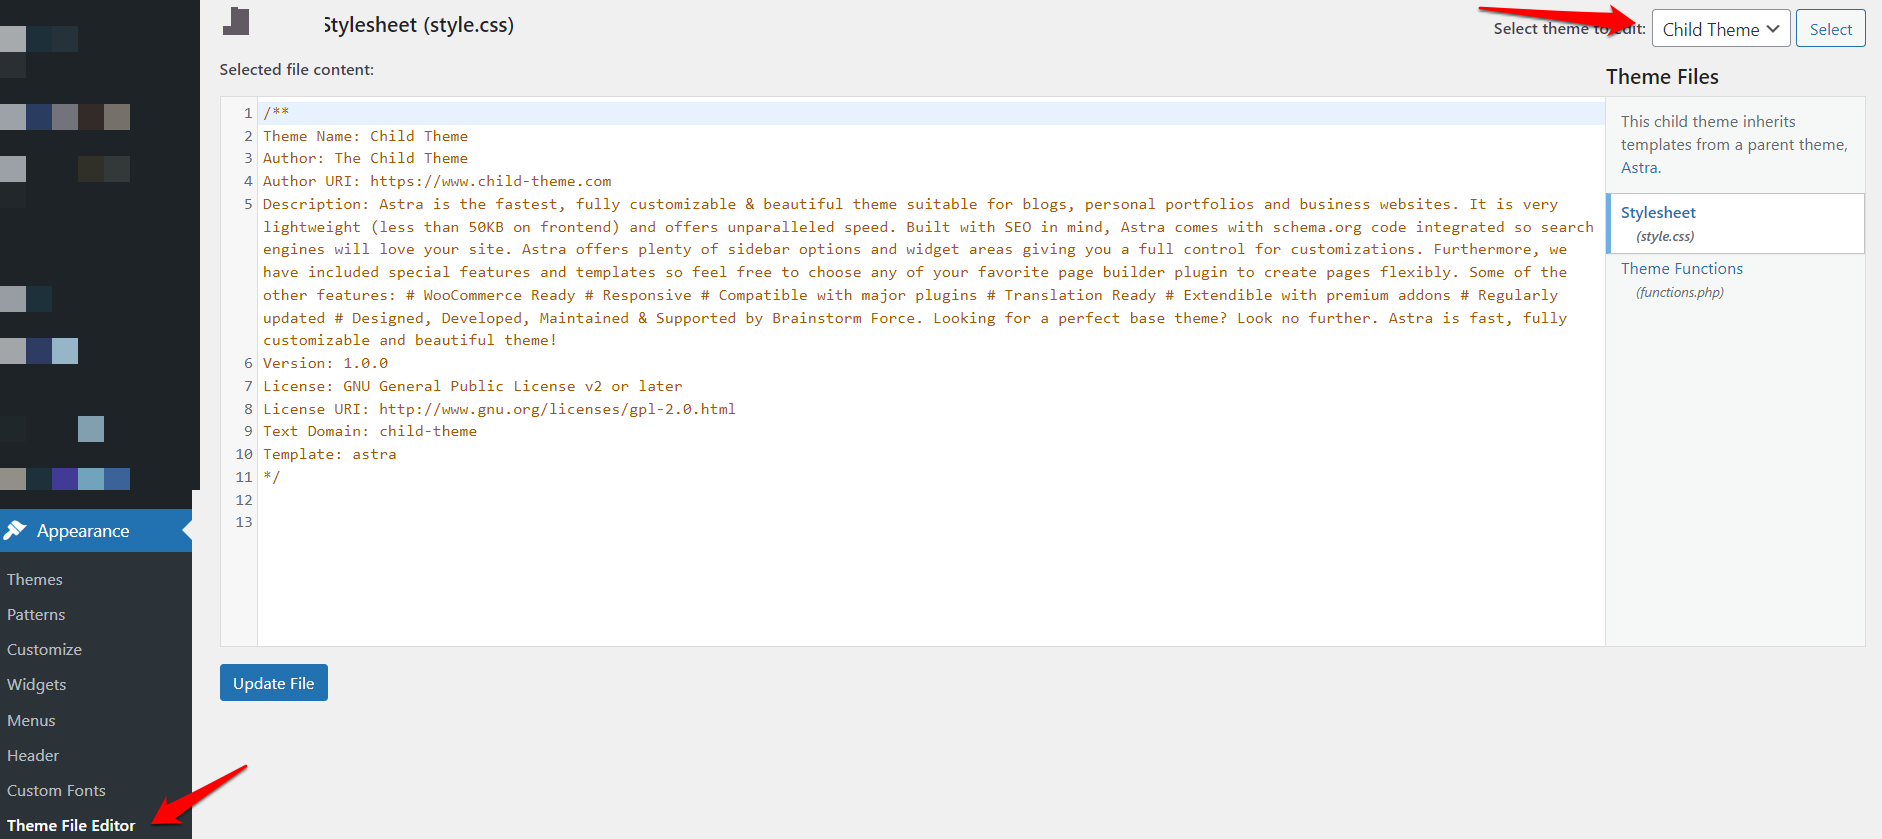
2. Create a Style.css File
Inside the child theme folder, create a file named style.css.
Add the following header to style.css:
/*
Theme Name: Your Theme Child
Template: your-theme
*/
Replace Your Theme Child with your child theme’s name.
Replace your-theme with the directory name of your parent theme.
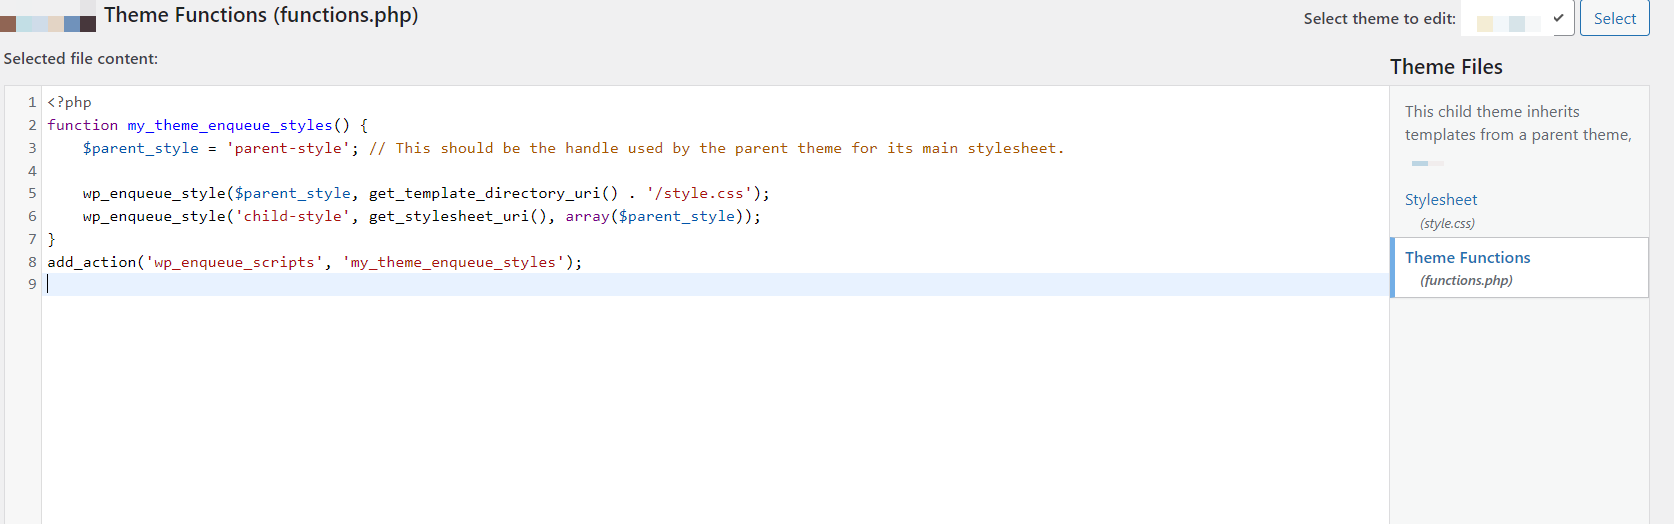
3. Create a functions.php File
Create a functions.php file in the child theme folder.
Enqueue the parent theme’s styles by adding the following code:
function my_theme_enqueue_styles() {
    $parent_style = 'parent-style'; // This should be the handle used by the parent theme for its main stylesheet.
    wp_enqueue_style($parent_style, get_template_directory_uri() . '/style.css');
    wp_enqueue_style('child-style', get_stylesheet_uri(), array($parent_style));
}
add_action('wp_enqueue_scripts', 'my_theme_enqueue_styles');
This code ensures that the parent theme’s CSS is loaded before the child theme’s CSS.
4. Activate the Child Theme
Go to your WordPress admin dashboard.
Navigate to Appearance > Themes.
You should see your child theme listed. Click Activate.
5. Customize Your Child Theme
You can now add custom CSS to style.css.
Add custom functions to functions.php.
If needed, copy template files from the parent theme to the child theme and modify them there. For example, if you want to change header.php, copy it from the parent theme to the child theme and edit it.
Appearance > File Theme Editor > Functions.php
Why do I still need Child Themes?
You Want to Make Safe Customizations: If you need to customize a theme deeply, a child theme is a safer way to do it without risking changes being lost during updates.
You Want to Preserve Modifications: Child themes help you maintain customizations even when updating the parent theme.
You’re Using a Theme Framework: Many premium themes and frameworks recommend or require the use of child themes to maintain upgrades and customizations.
However, with the rise of page builders like Elementor and Beaver Builder, and modern theme development practices, some users might prefer using these tools for customizations instead of diving into child themes. These tools offer flexibility and user-friendly interfaces for designing and modifying site layouts. Read this article next to get a better understanding the benefits of using page builders.
Modern themes and page builders like Elementor offer robust template customization options, reducing the need for traditional child themes in many cases. However, there are still scenarios where a child theme might be necessary or preferable. In this article, I discussed Child Themes vs. Page Builders: Their advantages, Their differences and My take on this subject matter.
Are Child Themes still necessary?
1. Performance Considerations
Streamlined Code: Customizing via a child theme allows you to create more streamlined and efficient code compared to page builders, which often add additional layers of abstraction that can slow down a site. I highly recommend using the Astra theme with its child theme generator.
2. Total Control Over the Theme
Full Template Overrides: Some developers prefer the fine-grained control a child theme offers. For instance, if you need to heavily modify the layout or logic in a file like single.php or archive.php, doing so in a child theme is often cleaner and more maintainable than working within a page builder’s limitations.
3. Complex Theme Integrations
Third-Party Integrations: If your site requires complex integrations with third-party services or custom PHP code that needs to be tightly coupled with your theme’s structure, a child theme offers the necessary flexibility.
4. Consistency Across Projects
Development Standards: For developers working on multiple projects, using child themes can provide a consistent approach to customizations, making it easier to manage and maintain across different sites.
What are the disadvantages in using Child Themes vs. Page Builders?
While child themes offer numerous benefits, they also come with some potential downsides. Here are the cons of using a child theme:
1. Complexity for Beginners
Learning Curve: Creating and managing a child theme requires some understanding of HTML, CSS, PHP, and WordPress structure. This can be challenging for beginners who may not be familiar with coding.
2. Maintenance Requirements
Ongoing Updates: As WordPress and the parent theme receive updates, your child theme might require adjustments to stay compatible. This can lead to additional maintenance work, especially if the parent theme undergoes significant changes.
3. Dependency on Parent Theme
Limited by Parent Theme: A child theme inherits all the functionality and design of the parent theme. If the parent theme is poorly coded or lacks flexibility, you might find it difficult to achieve your desired customizations without extensive modifications.
4. Potential for Conflicts
Compatibility Issues: If the parent theme is updated and includes changes that conflict with your child theme’s customizations, it can break your site. Resolving these conflicts might require significant troubleshooting and adjustments.
5. Increased Complexity in Debugging
Harder to Troubleshoot: When issues arise, it can be more difficult to diagnose problems since you need to consider both the parent and child theme files. This added layer of complexity can make debugging more time-consuming.
6. Slower Site Performance
Additional Files to Load: Although generally minimal, using a child theme adds extra files that WordPress needs to load. This can lead to slightly slower performance compared to a single, well-optimized theme.
7. Lack of Visual Editing
No Visual Interface: Unlike modern page builders, which provide a visual interface for customization, child themes require manual coding. This can be a drawback for users who prefer or need a more visual approach to site design and customization.
8. Limited Support from Theme Developers
Support Challenges: If you’re heavily customizing a theme via a child theme, you might find that the theme developer’s support is limited or unavailable for your specific modifications. This can leave you on your own when troubleshooting issues or implementing new features.
Should I use Page Builders then to customize my website?
Page builders have become a popular choice for many WordPress users and developers due to their ease of use and flexibility. Here are the key advantages of using page builders:
1. User-Friendly Interface
Drag-and-Drop Functionality: Page builders typically offer a drag-and-drop interface, making it easy for users to create complex layouts without needing to write code. This visual approach is intuitive and accessible, even for beginners.
2. Real-Time Editing
WYSIWYG (What You See Is What You Get): Page builders allow you to see changes in real-time as you edit your pages. This immediate feedback helps you design more efficiently and ensures that what you see in the editor matches what appears on the live site.
3. Pre-Built Templates and Blocks
Ready-Made Layouts: Most page builders come with a variety of pre-built templates and content blocks, such as headers, footers, galleries, and call-to-action buttons. These templates can be customized to fit your needs, saving time and effort.
4. Flexibility and Customization
Design Freedom: Page builders provide extensive customization options for individual elements, such as colors, fonts, spacing, and animations. This allows you to create unique and personalized designs without relying on a theme’s default settings.
5. Compatibility with Themes
Works with Most Themes: Page builders are designed to work with almost any WordPress theme, giving you the flexibility to switch themes without losing your custom layouts. This compatibility makes them a versatile choice for various projects.
6. Responsive Design
Mobile-Friendly Layouts: Many page builders include responsive design options, allowing you to easily adjust how your site looks on different devices. This ensures that your site is optimized for mobile, tablet, and desktop users.
7. Speed and Efficiency
Faster Development: With the ability to create and customize layouts quickly, page builders can significantly speed up the development process. This is especially beneficial for users who need to build websites quickly or manage multiple projects.
8. No Coding Required
Code-Free Customization: Page builders enable users to create sophisticated designs and layouts without needing to know HTML, CSS, or PHP. This democratizes web design, making it accessible to non-developers.
9. Integration with Other Plugins
Extensive Plugin Support: Many page builders are designed to work seamlessly with other popular WordPress plugins, such as WooCommerce, Yoast SEO, and contact form plugins. This integration enhances the functionality of your site without requiring additional coding.
10. Reusable Elements
Save and Reuse Designs: Page builders often allow you to save custom elements, sections, or entire pages as templates that can be reused across your site. This feature promotes consistency and saves time when building similar pages.
11. Built-In SEO Features
Optimized Content: Some page builders come with built-in SEO features or compatibility with SEO plugins, helping you optimize your content for search engines directly within the editor.
12. Regular Updates and Support
Active Development: Leading page builders are regularly updated with new features, bug fixes, and improvements. They also often come with extensive documentation, tutorials, and support to help you get the most out of the tool. So in terms of Child Themes vs. Page Builders, you may want to consider using the latter for more stable and updated code.
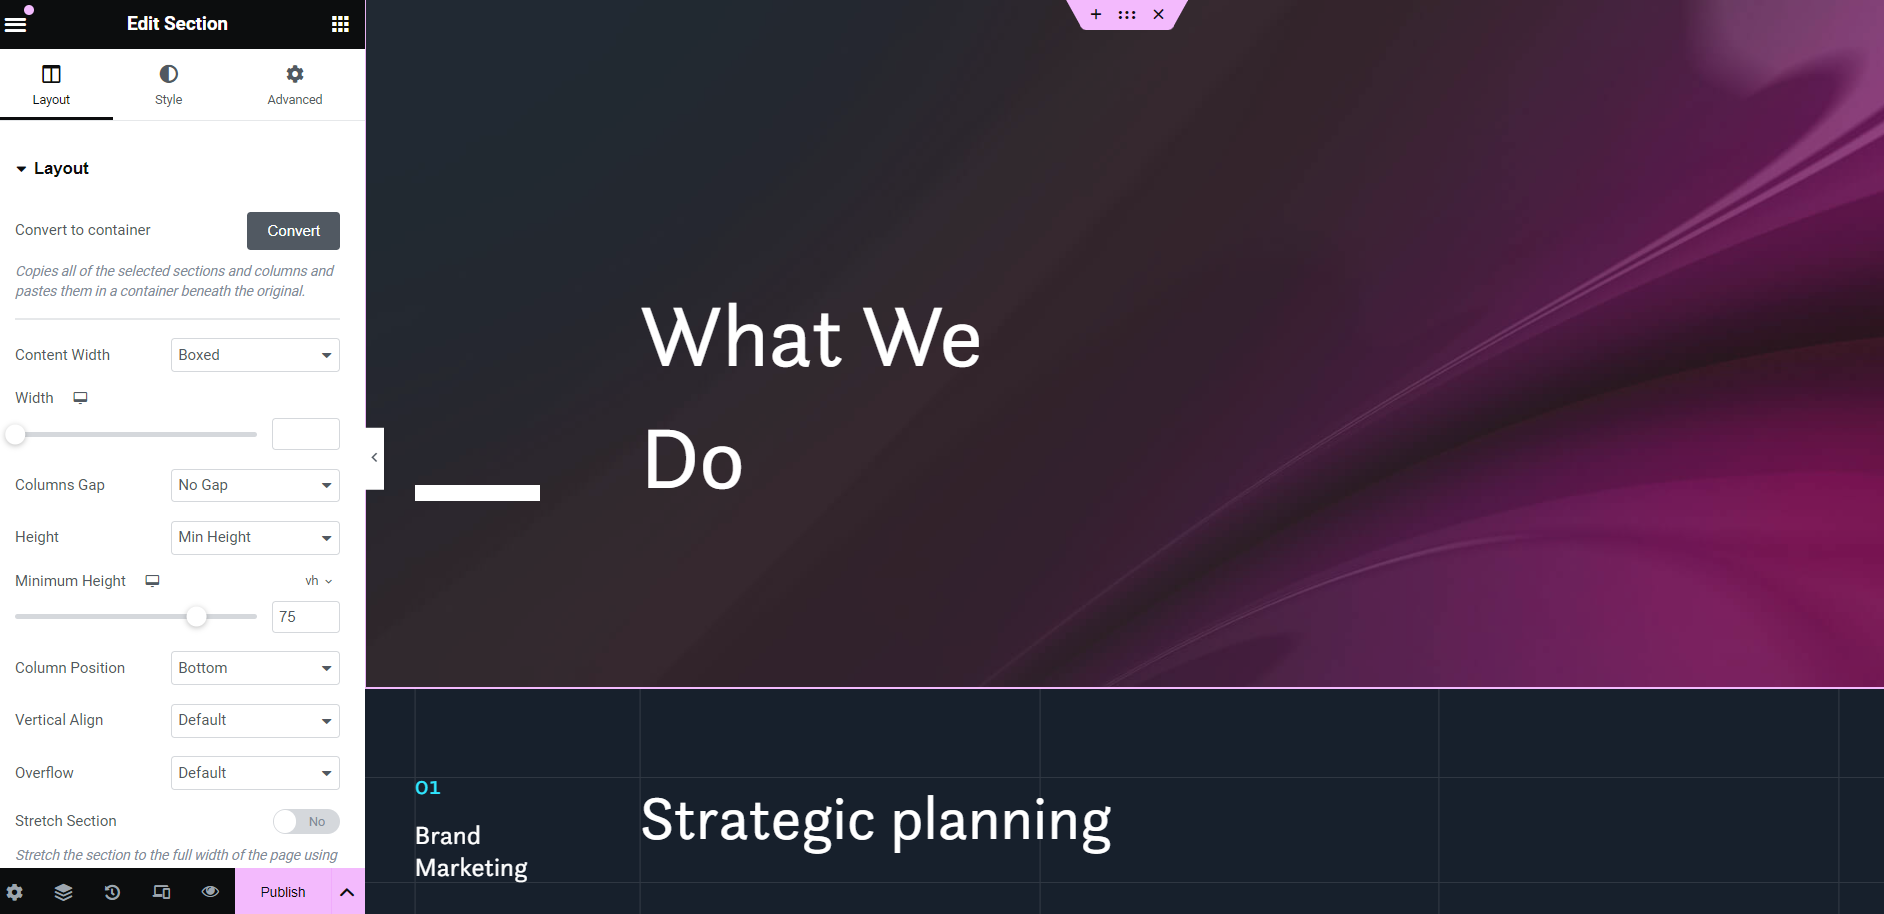
Elementor – Section Options
When to Use a Child Theme
If you need custom functionality or design that isn’t possible with a page builder.
If you are comfortable with coding and want to avoid the performance overhead of page builders.
If you require long-term stability and minimal dependence on third-party tools.
When to Use a Page Builder
If you prefer a visual, drag-and-drop interface for designing your site.
If you need to create a website quickly without diving into code.
If you want access to pre-designed templates and elements that can be customized easily.
My Personal Take on Child Themes vs. Page Builders
Over the years, I’ve been heavily reliant on child themes for fully customizing WordPress websites. This approach gave me complete control over every aspect of the site, which was invaluable for creating unique designs and functionalities. However, as time passed and I began working with a diverse range of clients, each with their own unique needs, I found myself gravitating towards more modern tools like page builders.
Page builders, such as Elementor and Beaver Builder, have proven to be incredibly useful. They offer a level of flexibility and straightforwardness that makes customization a breeze. I can now streamline the entire customization process, which is especially beneficial when clients want the ability to make their own tweaks. With the drag-and-drop features that these builders provide, clients no longer need a developer for every small change—they can handle it themselves. I support this by providing tutorials and videos to guide them through the process.
That said, when it comes to advanced customization, I’m still more than happy to step in. Despite the user-friendly nature of page builders, there are times when deeper customization is required, and I’m ready to help, even though these tools reduce the need for extensive coding knowledge.
In the past, I would rely on the child theme’s functions.php file for all my customizations. However, this often led to messy and disorganized code. Nowadays, I prefer using the Code Snippets plugin to keep my custom code clean and streamlined.
So, for now, I recommend using page builders every day, with the addition of code snippets when necessary. While child themes might seem like a thing of the past, I wouldn’t advise completely abandoning them—they still have their place, especially for those who require a higher level of customization.
Comments can be helpful on some websites, allowing visitors to share their thoughts and interact. However, not every site needs or wants comments. For business websites, portfolios, or other content where interaction isn’t necessary, comments can lead to spam, extra moderation work, and security concerns.
If you want to remove comments entirely, you can disable comments in WordPress without using a plugin. While there are plugins that can do this, using a bit of custom code is a more efficient and lightweight solution. The following code completely disables comments on your WordPress site, making sure that both the ability to post comments and any existing comments are removed from view.
This guide will explain why you might want to disable comments and how to easily do it with this code.
First Code
Below is just one of examples of the code that you can use immediately to disable comments in your WordPress website:
add_action('admin_init', function () {
    // Redirect any user trying to access comments page
    global $pagenow;
    if ($pagenow === 'edit-comments.php') {
        wp_safe_redirect(admin_url());
        exit;
    }
    // Remove comments metabox from dashboard
    remove_meta_box('dashboard_recent_comments', 'dashboard', 'normal');
    // Disable support for comments and trackbacks in post types
    foreach (get_post_types() as $post_type) {
        if (post_type_supports($post_type, 'comments')) {
            remove_post_type_support($post_type, 'comments');
            remove_post_type_support($post_type, 'trackbacks');
        }
    }
});
// Close comments on the front-end
add_filter('comments_open', '__return_false', 20, 2);
add_filter('pings_open', '__return_false', 20, 2);
// Hide existing comments
add_filter('comments_array', '__return_empty_array', 10, 2);
// Remove comments page in menu
add_action('admin_menu', function () {
    remove_menu_page('edit-comments.php');
});
// Remove comments links from admin bar
add_action('admin_bar_menu', function () {
    remove_action('admin_bar_menu', 'wp_admin_bar_comments_menu', 60);
}, 0);
Purpose of the Code
The code shared above is designed to completely disable comments on a WordPress site, including:
Backend Access: Redirecting any user who tries to access the comments page in the admin area.
Dashboard Clean-up: Removing the comments metabox from the WordPress dashboard.
Post Type Support: Disabling support for comments and trackbacks across all post types.
Frontend Comments: Closing comments and pings on the front-end, effectively preventing any new comments.
Hiding Existing Comments: Preventing existing comments from displaying on posts.
Admin Menu: Removing the comments page from the WordPress admin menu.
Admin Bar: Removing the comments link from the admin bar.
Importance of disabling comments in WordPress
You want to disable comments site-wide without relying on a plugin.
You don’t want to deal with comment moderation, spam, or any user-generated content via comments.
Your site doesn’t require interaction through comments, such as for a business site, portfolio, or any content where comments aren’t relevant.
Correctness and Revisions
The code is mostly correct and well-structured. Here are some minor revisions:
Admin Bar Cleanup: The code to remove the comments link from the admin bar could be adjusted for better readability:
add_action('admin_bar_menu', function ($wp_admin_bar) {
    $wp_admin_bar->remove_node('comments');
}, 999);
This approach uses the $wp_admin_bar object, which is a bit more robust.
Compatibility: To ensure maximum compatibility, you might want to add an if (function_exists(...)) check around each action or filter to avoid any issues if WordPress changes its internal APIs in future updates.
Functionality Expansion: If you want to remove comment-related widgets as well, you could add this:
add_action('widgets_init', function () {
    unregister_widget('WP_Widget_Recent_Comments');
});
Plugin and Theme Compatibility: Ensure that your theme or plugins don’t re-enable comments or conflict with this code. If you notice any conflicts, you may need to further customize this code.
Conclusion
The code is solid and does what it’s intended to do: disable all aspects of comments on a WordPress site. The minor revisions I suggested can improve readability and robustness but aren’t strictly necessary.
Enabling SVG upload in WordPress can be a standard practice when creating a WordPress website, but whether it should be depends on the specific needs and goals of the project. Allowing WordPress to upload SVG (Scalable Vector Graphics) files can be important for several reasons.
Importance of uploading and using SVG files:
1. Scalability Without Quality Loss
SVG files are vector-based, meaning they can scale to any size without losing quality. This is particularly useful for logos, icons, and other graphics that need to appear crisp on screens of all sizes, from small mobile devices to large desktop monitors.
2. Smaller File Sizes
Compared to raster images like PNG or JPEG, SVG files are often much smaller in size. This can help improve website load times and reduce bandwidth usage, which is beneficial for both user experience and SEO.
3. Customizability
SVG files are essentially XML code, allowing for easy customization. Developers can change colors, sizes, and other properties directly through CSS or JavaScript without needing to create new image files.
4. Accessibility
SVG images can be made more accessible by adding descriptive titles and text within the SVG code. This can improve the experience for users relying on screen readers.
5. SEO Benefits
Since SVGs are text-based, they can be indexed by search engines, potentially improving the SEO of your website. Descriptive titles, metadata, and text within SVGs can contribute to better search visibility.
6. Animation Capabilities
SVGs support animations and interactions. This means you can create more dynamic and engaging elements on your website without relying on heavy JavaScript or GIFs.
7. Consistency Across Browsers
SVGs are supported by all modern web browsers, ensuring consistent appearance and behavior across different platforms.
How to allow SVG uploads for admin users
To enable SVG upload in WordPress, you only need this code below. This code provides a good balance between functionality and security, especially by restricting uploads to administrators only.
/**
 * Allow SVG uploads for administrator users.
 * @param array $upload_mimes Allowed mime types.
 * @return mixed
 */
add_filter(
	'upload_mimes',
	function ( $upload_mimes ) {
		// Only allow SVG uploads for administrators
		if ( ! current_user_can( 'administrator' ) ) {
			return $upload_mimes;
		}
		// Add SVG and SVGZ mime types
		$upload_mimes['svg']  = 'image/svg+xml';
		$upload_mimes['svgz'] = 'image/svg+xml';
		return $upload_mimes;
	}
);
/**
 * Add SVG files mime check.
 * @param array        $wp_check_filetype_and_ext Values for the extension, mime type, and corrected filename.
 * @param string       $file Full path to the file.
 * @param string       $filename The name of the file (may differ from $file due to $file being in a tmp directory).
 * @param string[]     $mimes Array of mime types keyed by their file extension regex.
 * @param string|false $real_mime The actual mime type or false if the type cannot be determined.
 * @return array       Updated values for extension, mime type, and corrected filename.
 */
add_filter(
	'wp_check_filetype_and_ext',
	function ( $wp_check_filetype_and_ext, $file, $filename, $mimes, $real_mime ) {
		if ( ! $wp_check_filetype_and_ext['type'] ) {
			// Check the file type against the allowed mimes
			$check_filetype  = wp_check_filetype( $filename, $mimes );
			$ext             = $check_filetype['ext'];
			$type            = $check_filetype['type'];
			$proper_filename = $filename;
			// Ensure that only SVG files are allowed if the mime type starts with 'image/'
			if ( $type && 0 === strpos( $type, 'image/' ) && 'svg' !== $ext ) {
				$ext  = false;
				$type = false;
			}
			// Return the corrected file type information
			$wp_check_filetype_and_ext = compact( 'ext', 'type', 'proper_filename' );
		}
		return $wp_check_filetype_and_ext;
	},
	10,
	5
);
Explanation of the Code:
Security Check for Administrators: The upload_mimes filter is used to allow only administrators to upload SVG files, which mitigates some of the security risks by limiting who can upload SVG files.
MIME Type Check: The wp_check_filetype_and_ext filter ensures that the file being uploaded is correctly identified as an SVG file. It checks the MIME type and extension to make sure that only SVG files are uploaded.
Ensuring Proper File Type: The additional check ensures that only files with the correct MIME type (image/svg+xml) and the .svg extension are allowed.
Security Consideration
Even with these measures, SVG files can still pose security risks because they can contain JavaScript or other code that could be exploited. Alternatively, to enable SVG upload in WordPress, consider using a plugin or library to sanitize SVG files before allowing them to be uploaded. For example, you could use a plugin like “Safe SVG” to sanitize SVG files automatically.
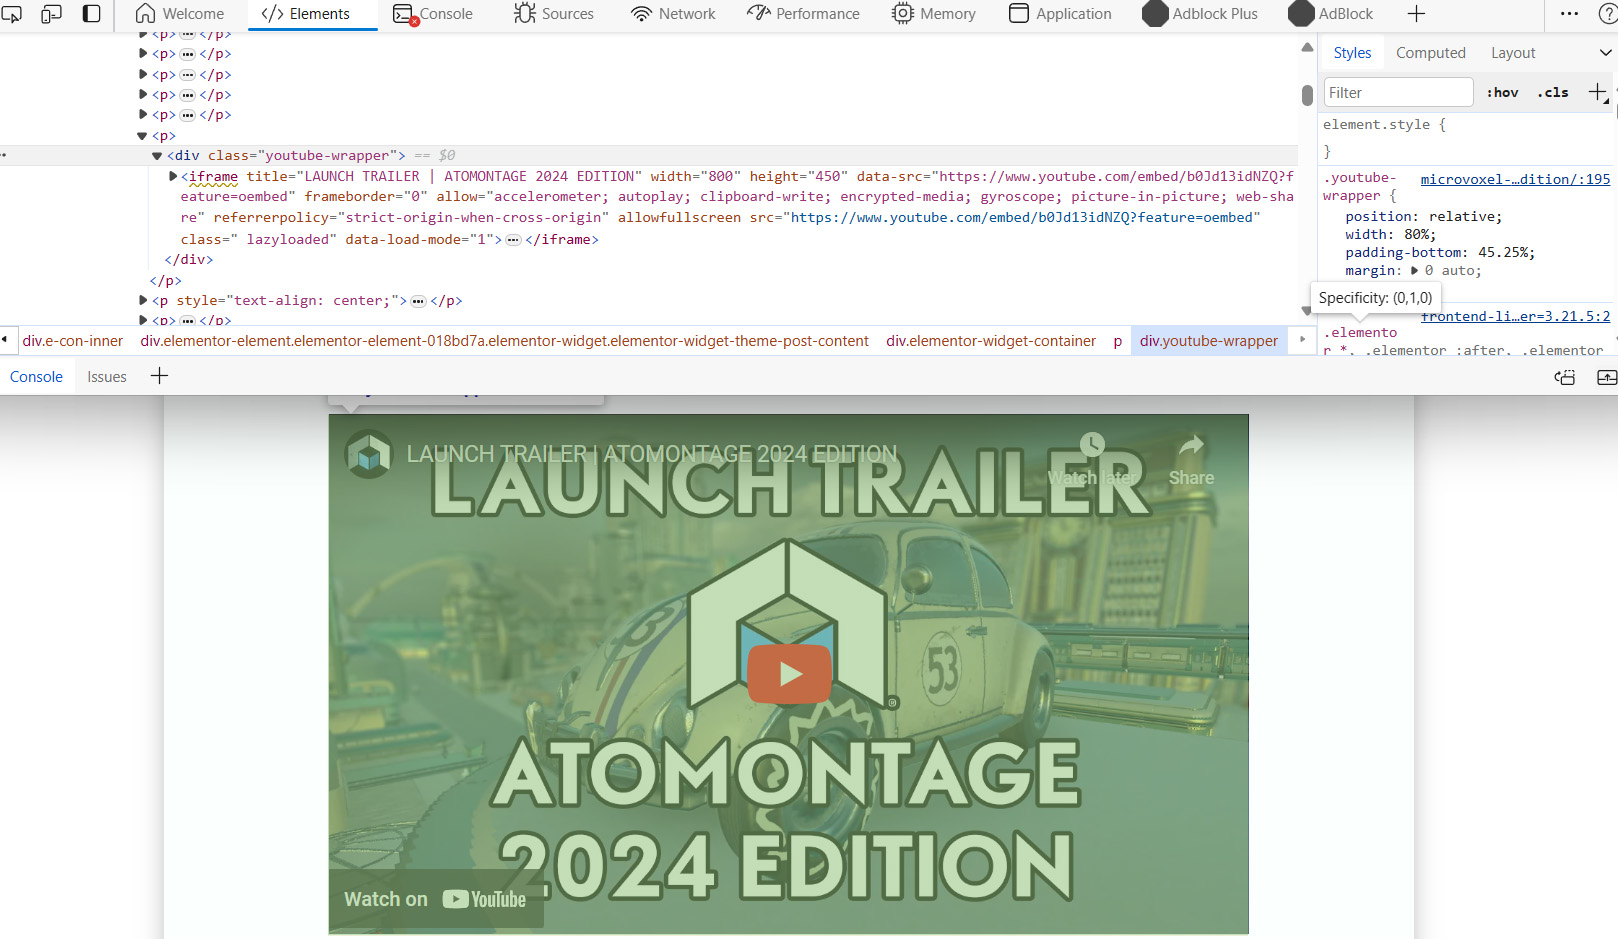
When embedding a YouTube video in a WordPress post, you typically just paste the video link or URL directly. This makes the video display at full width in the post, which might look too large if the post or page has a wider layout. To fix this and make the video size more adaptable, you need to wrap the video iframe in a div tag.
Since pasting the URL directly doesn’t let you modify the iframe code, you’ll have to use JavaScript to wrap the iframe in a div. Here’s how to do it:
Add the following JavaScript code to the footer of your site:
window.addEventListener('DOMContentLoaded', function() {
  var iframes = document.querySelectorAll('iframe[data-src^="https://www.youtube.com/embed/"]');
  for (var i = 0; i < iframes.length; i++) {
    var iframe = iframes[i];
    var wrapper = document.createElement('div');
    wrapper.classList.add('youtube-wrapper');
    iframe.parentNode.insertBefore(wrapper, iframe);
    wrapper.appendChild(iframe);
  }
});
To add this script, use a theme option, a plugin like Code Snippets, or the Elementor Code option if you're using Elementor. Assign the script to run only on Blog Posts to avoid conflicts.
Now that the iframe is wrapped in a div with the class "youtube-wrapper," you can style it with CSS to adjust the size and ensure it stays responsive. Add the following CSS to the header:
Adjust the width and padding-bottom values as needed to fit your design. You may also need to add media queries to ensure the video adapts to different screen sizes, making it full-width on smaller screens.
Remember, it's important to clearly document your code with descriptive titles so other site admins understand its purpose. Keep this code separate from other scripts for better organization.
In conclusion, wrapping YouTube iframes in a div and using CSS to style them allows you to control the video size and ensure it looks good on all devices. This approach not only enhances the visual appeal of your site but also maintains a professional and user-friendly layout.
Why optimize website’s top menu? To enhance the user experience and improve the overall look of your website, optimizing the top menu is critical. Here are some tips to consider when redesigning it:
Simplify the menu
Use clear and concise language with intuitive iconography to make it easy for users to navigate through it.
Reduce logo size
Although the logo is essential, it should not dominate the menu. To make more room for menu items, consider making the logo smaller.
Use dropdown or fly-out menus
Incorporating these menus can help declutter the page and make it easier for users to locate specific pages.
Optimize for mobile devices
As more users access websites via mobile devices, it is crucial to ensure that the menu functions effectively on smaller screens.
Conduct user testing
Testing is an excellent way to determine if the menu is functioning as expected and identify usability issues that require attention.
You need to Optimize Website’s Top Menu
Simplifying the menu is the first step to optimize the top menu. Using clear language and intuitive iconography helps users navigate more easily. To avoid dominating the menu with the logo, reducing the logo size can create more room for menu items. Incorporating dropdown or fly-out menus helps reduce clutter on the page and makes it simpler for users to locate specific pages. Given the rise in mobile device usage, it is essential to ensure the menu functions correctly on smaller screens. User testing is crucial in determining whether the menu functions as expected and identifying usability issues that require attention.
Optimizing the top menu enhances the user experience and improves the aesthetic of your website. By implementing these suggestions, you can redesign your website’s top menu in a visually pleasing and user-friendly way.


