Child themes in WordPress are still relevant and very useful, especially when you want to make customizations without altering the parent theme directly. Here’s a guide on how to use, install, and set up a child theme:
Why Use a Child Theme?
Safe Customizations: You can make changes to a child theme without affecting the parent theme. This ensures that updates to the parent theme won’t overwrite your customizations.
Easy Maintenance: If you need to update the parent theme, your changes remain intact in the child theme.
Structured Customization: It keeps your custom code organized and separate from the theme’s core files. Check out this article to find out more about the advantages of using Child themes.
How to Install and Set Up a Child Theme in WordPress
1. Create the Child Theme Folder
Navigate to wp-content/themes on your server or in your file manager.
Create a new folder for your child theme. You might name it something like your-theme-child.
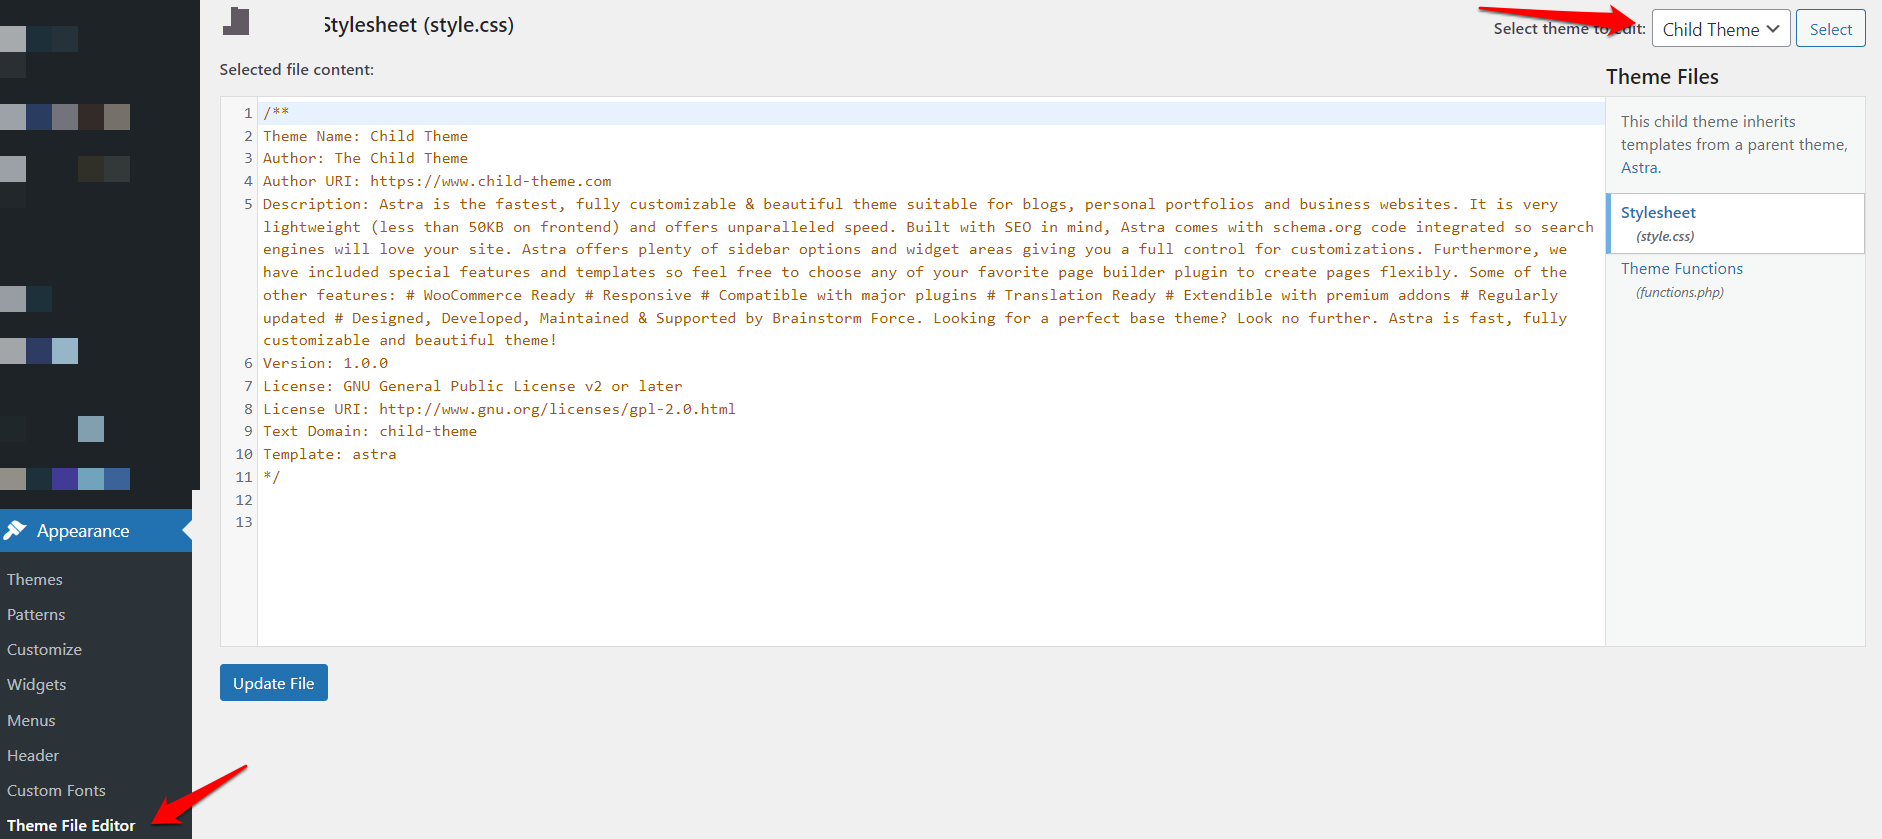
2. Create a Style.css File
Inside the child theme folder, create a file named style.css.
Add the following header to style.css:
/*
Theme Name: Your Theme Child
Template: your-theme
*/
Replace Your Theme Child with your child theme’s name.
Replace your-theme with the directory name of your parent theme.
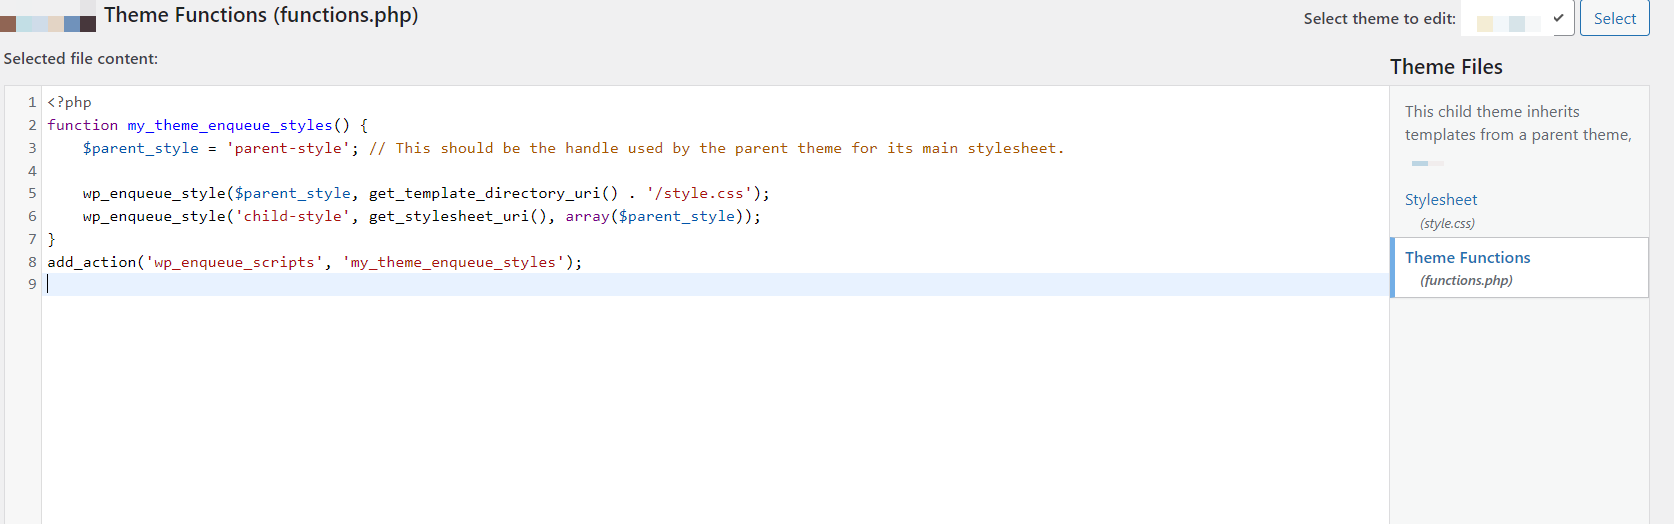
3. Create a functions.php File
Create a functions.php file in the child theme folder.
Enqueue the parent theme’s styles by adding the following code:
function my_theme_enqueue_styles() {
    $parent_style = 'parent-style'; // This should be the handle used by the parent theme for its main stylesheet.
    wp_enqueue_style($parent_style, get_template_directory_uri() . '/style.css');
    wp_enqueue_style('child-style', get_stylesheet_uri(), array($parent_style));
}
add_action('wp_enqueue_scripts', 'my_theme_enqueue_styles');
This code ensures that the parent theme’s CSS is loaded before the child theme’s CSS.
4. Activate the Child Theme
Go to your WordPress admin dashboard.
Navigate to Appearance > Themes.
You should see your child theme listed. Click Activate.
5. Customize Your Child Theme
You can now add custom CSS to style.css.
Add custom functions to functions.php.
If needed, copy template files from the parent theme to the child theme and modify them there. For example, if you want to change header.php, copy it from the parent theme to the child theme and edit it.
Appearance > File Theme Editor > Functions.php
Why do I still need Child Themes?
You Want to Make Safe Customizations: If you need to customize a theme deeply, a child theme is a safer way to do it without risking changes being lost during updates.
You Want to Preserve Modifications: Child themes help you maintain customizations even when updating the parent theme.
You’re Using a Theme Framework: Many premium themes and frameworks recommend or require the use of child themes to maintain upgrades and customizations.
However, with the rise of page builders like Elementor and Beaver Builder, and modern theme development practices, some users might prefer using these tools for customizations instead of diving into child themes. These tools offer flexibility and user-friendly interfaces for designing and modifying site layouts. Read this article next to get a better understanding the benefits of using page builders.
Modern themes and page builders like Elementor offer robust template customization options, reducing the need for traditional child themes in many cases. However, there are still scenarios where a child theme might be necessary or preferable. In this article, I discussed Child Themes vs. Page Builders: Their advantages, Their differences and My take on this subject matter.
Are Child Themes still necessary?
1. Performance Considerations
Streamlined Code: Customizing via a child theme allows you to create more streamlined and efficient code compared to page builders, which often add additional layers of abstraction that can slow down a site. I highly recommend using the Astra theme with its child theme generator.
2. Total Control Over the Theme
Full Template Overrides: Some developers prefer the fine-grained control a child theme offers. For instance, if you need to heavily modify the layout or logic in a file like single.php or archive.php, doing so in a child theme is often cleaner and more maintainable than working within a page builder’s limitations.
3. Complex Theme Integrations
Third-Party Integrations: If your site requires complex integrations with third-party services or custom PHP code that needs to be tightly coupled with your theme’s structure, a child theme offers the necessary flexibility.
4. Consistency Across Projects
Development Standards: For developers working on multiple projects, using child themes can provide a consistent approach to customizations, making it easier to manage and maintain across different sites.
What are the disadvantages in using Child Themes vs. Page Builders?
While child themes offer numerous benefits, they also come with some potential downsides. Here are the cons of using a child theme:
1. Complexity for Beginners
Learning Curve: Creating and managing a child theme requires some understanding of HTML, CSS, PHP, and WordPress structure. This can be challenging for beginners who may not be familiar with coding.
2. Maintenance Requirements
Ongoing Updates: As WordPress and the parent theme receive updates, your child theme might require adjustments to stay compatible. This can lead to additional maintenance work, especially if the parent theme undergoes significant changes.
3. Dependency on Parent Theme
Limited by Parent Theme: A child theme inherits all the functionality and design of the parent theme. If the parent theme is poorly coded or lacks flexibility, you might find it difficult to achieve your desired customizations without extensive modifications.
4. Potential for Conflicts
Compatibility Issues: If the parent theme is updated and includes changes that conflict with your child theme’s customizations, it can break your site. Resolving these conflicts might require significant troubleshooting and adjustments.
5. Increased Complexity in Debugging
Harder to Troubleshoot: When issues arise, it can be more difficult to diagnose problems since you need to consider both the parent and child theme files. This added layer of complexity can make debugging more time-consuming.
6. Slower Site Performance
Additional Files to Load: Although generally minimal, using a child theme adds extra files that WordPress needs to load. This can lead to slightly slower performance compared to a single, well-optimized theme.
7. Lack of Visual Editing
No Visual Interface: Unlike modern page builders, which provide a visual interface for customization, child themes require manual coding. This can be a drawback for users who prefer or need a more visual approach to site design and customization.
8. Limited Support from Theme Developers
Support Challenges: If you’re heavily customizing a theme via a child theme, you might find that the theme developer’s support is limited or unavailable for your specific modifications. This can leave you on your own when troubleshooting issues or implementing new features.
Should I use Page Builders then to customize my website?
Page builders have become a popular choice for many WordPress users and developers due to their ease of use and flexibility. Here are the key advantages of using page builders:
1. User-Friendly Interface
Drag-and-Drop Functionality: Page builders typically offer a drag-and-drop interface, making it easy for users to create complex layouts without needing to write code. This visual approach is intuitive and accessible, even for beginners.
2. Real-Time Editing
WYSIWYG (What You See Is What You Get): Page builders allow you to see changes in real-time as you edit your pages. This immediate feedback helps you design more efficiently and ensures that what you see in the editor matches what appears on the live site.
3. Pre-Built Templates and Blocks
Ready-Made Layouts: Most page builders come with a variety of pre-built templates and content blocks, such as headers, footers, galleries, and call-to-action buttons. These templates can be customized to fit your needs, saving time and effort.
4. Flexibility and Customization
Design Freedom: Page builders provide extensive customization options for individual elements, such as colors, fonts, spacing, and animations. This allows you to create unique and personalized designs without relying on a theme’s default settings.
5. Compatibility with Themes
Works with Most Themes: Page builders are designed to work with almost any WordPress theme, giving you the flexibility to switch themes without losing your custom layouts. This compatibility makes them a versatile choice for various projects.
6. Responsive Design
Mobile-Friendly Layouts: Many page builders include responsive design options, allowing you to easily adjust how your site looks on different devices. This ensures that your site is optimized for mobile, tablet, and desktop users.
7. Speed and Efficiency
Faster Development: With the ability to create and customize layouts quickly, page builders can significantly speed up the development process. This is especially beneficial for users who need to build websites quickly or manage multiple projects.
8. No Coding Required
Code-Free Customization: Page builders enable users to create sophisticated designs and layouts without needing to know HTML, CSS, or PHP. This democratizes web design, making it accessible to non-developers.
9. Integration with Other Plugins
Extensive Plugin Support: Many page builders are designed to work seamlessly with other popular WordPress plugins, such as WooCommerce, Yoast SEO, and contact form plugins. This integration enhances the functionality of your site without requiring additional coding.
10. Reusable Elements
Save and Reuse Designs: Page builders often allow you to save custom elements, sections, or entire pages as templates that can be reused across your site. This feature promotes consistency and saves time when building similar pages.
11. Built-In SEO Features
Optimized Content: Some page builders come with built-in SEO features or compatibility with SEO plugins, helping you optimize your content for search engines directly within the editor.
12. Regular Updates and Support
Active Development: Leading page builders are regularly updated with new features, bug fixes, and improvements. They also often come with extensive documentation, tutorials, and support to help you get the most out of the tool. So in terms of Child Themes vs. Page Builders, you may want to consider using the latter for more stable and updated code.
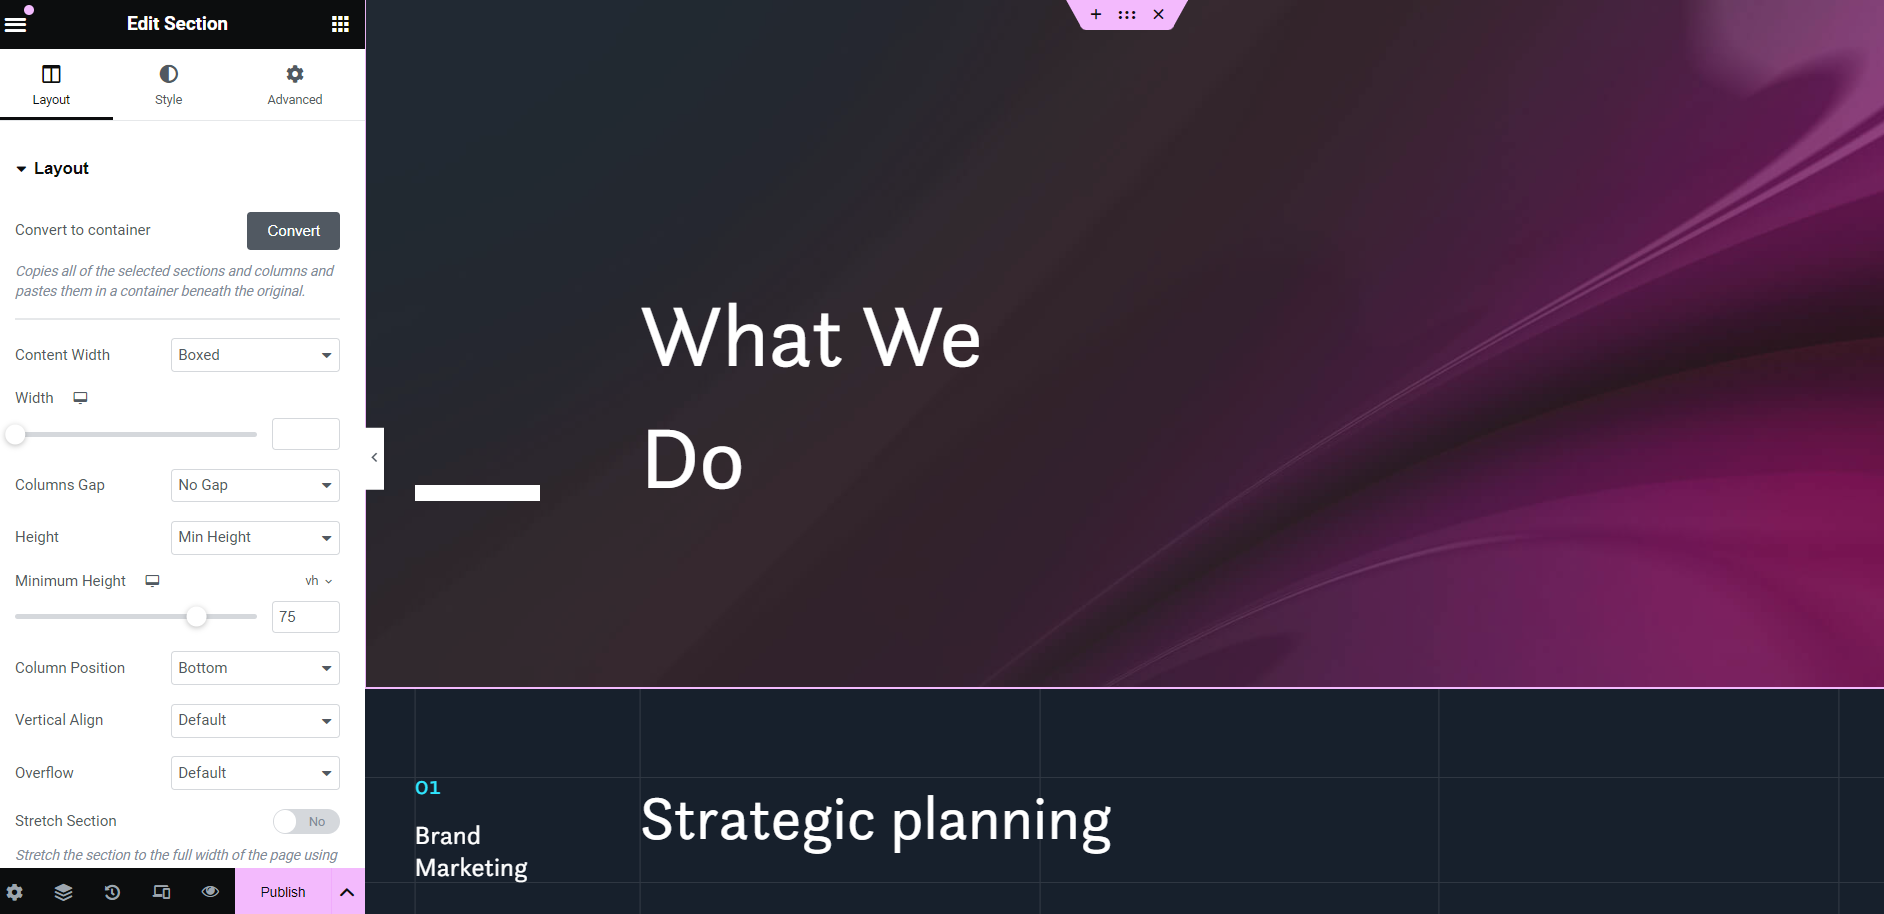
Elementor – Section Options
When to Use a Child Theme
If you need custom functionality or design that isn’t possible with a page builder.
If you are comfortable with coding and want to avoid the performance overhead of page builders.
If you require long-term stability and minimal dependence on third-party tools.
When to Use a Page Builder
If you prefer a visual, drag-and-drop interface for designing your site.
If you need to create a website quickly without diving into code.
If you want access to pre-designed templates and elements that can be customized easily.
My Personal Take on Child Themes vs. Page Builders
Over the years, I’ve been heavily reliant on child themes for fully customizing WordPress websites. This approach gave me complete control over every aspect of the site, which was invaluable for creating unique designs and functionalities. However, as time passed and I began working with a diverse range of clients, each with their own unique needs, I found myself gravitating towards more modern tools like page builders.
Page builders, such as Elementor and Beaver Builder, have proven to be incredibly useful. They offer a level of flexibility and straightforwardness that makes customization a breeze. I can now streamline the entire customization process, which is especially beneficial when clients want the ability to make their own tweaks. With the drag-and-drop features that these builders provide, clients no longer need a developer for every small change—they can handle it themselves. I support this by providing tutorials and videos to guide them through the process.
That said, when it comes to advanced customization, I’m still more than happy to step in. Despite the user-friendly nature of page builders, there are times when deeper customization is required, and I’m ready to help, even though these tools reduce the need for extensive coding knowledge.
In the past, I would rely on the child theme’s functions.php file for all my customizations. However, this often led to messy and disorganized code. Nowadays, I prefer using the Code Snippets plugin to keep my custom code clean and streamlined.
So, for now, I recommend using page builders every day, with the addition of code snippets when necessary. While child themes might seem like a thing of the past, I wouldn’t advise completely abandoning them—they still have their place, especially for those who require a higher level of customization.
Comments can be helpful on some websites, allowing visitors to share their thoughts and interact. However, not every site needs or wants comments. For business websites, portfolios, or other content where interaction isn’t necessary, comments can lead to spam, extra moderation work, and security concerns.
If you want to remove comments entirely, you can disable comments in WordPress without using a plugin. While there are plugins that can do this, using a bit of custom code is a more efficient and lightweight solution. The following code completely disables comments on your WordPress site, making sure that both the ability to post comments and any existing comments are removed from view.
This guide will explain why you might want to disable comments and how to easily do it with this code.
First Code
Below is just one of examples of the code that you can use immediately to disable comments in your WordPress website:
add_action('admin_init', function () {
    // Redirect any user trying to access comments page
    global $pagenow;
    if ($pagenow === 'edit-comments.php') {
        wp_safe_redirect(admin_url());
        exit;
    }
    // Remove comments metabox from dashboard
    remove_meta_box('dashboard_recent_comments', 'dashboard', 'normal');
    // Disable support for comments and trackbacks in post types
    foreach (get_post_types() as $post_type) {
        if (post_type_supports($post_type, 'comments')) {
            remove_post_type_support($post_type, 'comments');
            remove_post_type_support($post_type, 'trackbacks');
        }
    }
});
// Close comments on the front-end
add_filter('comments_open', '__return_false', 20, 2);
add_filter('pings_open', '__return_false', 20, 2);
// Hide existing comments
add_filter('comments_array', '__return_empty_array', 10, 2);
// Remove comments page in menu
add_action('admin_menu', function () {
    remove_menu_page('edit-comments.php');
});
// Remove comments links from admin bar
add_action('admin_bar_menu', function () {
    remove_action('admin_bar_menu', 'wp_admin_bar_comments_menu', 60);
}, 0);
Purpose of the Code
The code shared above is designed to completely disable comments on a WordPress site, including:
Backend Access: Redirecting any user who tries to access the comments page in the admin area.
Dashboard Clean-up: Removing the comments metabox from the WordPress dashboard.
Post Type Support: Disabling support for comments and trackbacks across all post types.
Frontend Comments: Closing comments and pings on the front-end, effectively preventing any new comments.
Hiding Existing Comments: Preventing existing comments from displaying on posts.
Admin Menu: Removing the comments page from the WordPress admin menu.
Admin Bar: Removing the comments link from the admin bar.
Importance of disabling comments in WordPress
You want to disable comments site-wide without relying on a plugin.
You don’t want to deal with comment moderation, spam, or any user-generated content via comments.
Your site doesn’t require interaction through comments, such as for a business site, portfolio, or any content where comments aren’t relevant.
Correctness and Revisions
The code is mostly correct and well-structured. Here are some minor revisions:
Admin Bar Cleanup: The code to remove the comments link from the admin bar could be adjusted for better readability:
add_action('admin_bar_menu', function ($wp_admin_bar) {
    $wp_admin_bar->remove_node('comments');
}, 999);
This approach uses the $wp_admin_bar object, which is a bit more robust.
Compatibility: To ensure maximum compatibility, you might want to add an if (function_exists(...)) check around each action or filter to avoid any issues if WordPress changes its internal APIs in future updates.
Functionality Expansion: If you want to remove comment-related widgets as well, you could add this:
add_action('widgets_init', function () {
    unregister_widget('WP_Widget_Recent_Comments');
});
Plugin and Theme Compatibility: Ensure that your theme or plugins don’t re-enable comments or conflict with this code. If you notice any conflicts, you may need to further customize this code.
Conclusion
The code is solid and does what it’s intended to do: disable all aspects of comments on a WordPress site. The minor revisions I suggested can improve readability and robustness but aren’t strictly necessary.
Enabling SVG upload in WordPress can be a standard practice when creating a WordPress website, but whether it should be depends on the specific needs and goals of the project. Allowing WordPress to upload SVG (Scalable Vector Graphics) files can be important for several reasons.
Importance of uploading and using SVG files:
1. Scalability Without Quality Loss
SVG files are vector-based, meaning they can scale to any size without losing quality. This is particularly useful for logos, icons, and other graphics that need to appear crisp on screens of all sizes, from small mobile devices to large desktop monitors.
2. Smaller File Sizes
Compared to raster images like PNG or JPEG, SVG files are often much smaller in size. This can help improve website load times and reduce bandwidth usage, which is beneficial for both user experience and SEO.
3. Customizability
SVG files are essentially XML code, allowing for easy customization. Developers can change colors, sizes, and other properties directly through CSS or JavaScript without needing to create new image files.
4. Accessibility
SVG images can be made more accessible by adding descriptive titles and text within the SVG code. This can improve the experience for users relying on screen readers.
5. SEO Benefits
Since SVGs are text-based, they can be indexed by search engines, potentially improving the SEO of your website. Descriptive titles, metadata, and text within SVGs can contribute to better search visibility.
6. Animation Capabilities
SVGs support animations and interactions. This means you can create more dynamic and engaging elements on your website without relying on heavy JavaScript or GIFs.
7. Consistency Across Browsers
SVGs are supported by all modern web browsers, ensuring consistent appearance and behavior across different platforms.
How to allow SVG uploads for admin users
To enable SVG upload in WordPress, you only need this code below. This code provides a good balance between functionality and security, especially by restricting uploads to administrators only.
/**
 * Allow SVG uploads for administrator users.
 * @param array $upload_mimes Allowed mime types.
 * @return mixed
 */
add_filter(
	'upload_mimes',
	function ( $upload_mimes ) {
		// Only allow SVG uploads for administrators
		if ( ! current_user_can( 'administrator' ) ) {
			return $upload_mimes;
		}
		// Add SVG and SVGZ mime types
		$upload_mimes['svg']  = 'image/svg+xml';
		$upload_mimes['svgz'] = 'image/svg+xml';
		return $upload_mimes;
	}
);
/**
 * Add SVG files mime check.
 * @param array        $wp_check_filetype_and_ext Values for the extension, mime type, and corrected filename.
 * @param string       $file Full path to the file.
 * @param string       $filename The name of the file (may differ from $file due to $file being in a tmp directory).
 * @param string[]     $mimes Array of mime types keyed by their file extension regex.
 * @param string|false $real_mime The actual mime type or false if the type cannot be determined.
 * @return array       Updated values for extension, mime type, and corrected filename.
 */
add_filter(
	'wp_check_filetype_and_ext',
	function ( $wp_check_filetype_and_ext, $file, $filename, $mimes, $real_mime ) {
		if ( ! $wp_check_filetype_and_ext['type'] ) {
			// Check the file type against the allowed mimes
			$check_filetype  = wp_check_filetype( $filename, $mimes );
			$ext             = $check_filetype['ext'];
			$type            = $check_filetype['type'];
			$proper_filename = $filename;
			// Ensure that only SVG files are allowed if the mime type starts with 'image/'
			if ( $type && 0 === strpos( $type, 'image/' ) && 'svg' !== $ext ) {
				$ext  = false;
				$type = false;
			}
			// Return the corrected file type information
			$wp_check_filetype_and_ext = compact( 'ext', 'type', 'proper_filename' );
		}
		return $wp_check_filetype_and_ext;
	},
	10,
	5
);
Explanation of the Code:
Security Check for Administrators: The upload_mimes filter is used to allow only administrators to upload SVG files, which mitigates some of the security risks by limiting who can upload SVG files.
MIME Type Check: The wp_check_filetype_and_ext filter ensures that the file being uploaded is correctly identified as an SVG file. It checks the MIME type and extension to make sure that only SVG files are uploaded.
Ensuring Proper File Type: The additional check ensures that only files with the correct MIME type (image/svg+xml) and the .svg extension are allowed.
Security Consideration
Even with these measures, SVG files can still pose security risks because they can contain JavaScript or other code that could be exploited. Alternatively, to enable SVG upload in WordPress, consider using a plugin or library to sanitize SVG files before allowing them to be uploaded. For example, you could use a plugin like “Safe SVG” to sanitize SVG files automatically.
When embedding a YouTube video in a WordPress post, you typically just paste the video link or URL directly. This makes the video display at full width in the post, which might look too large if the post or page has a wider layout. To fix this and make the video size more adaptable, you need to wrap the video iframe in a div tag.
Since pasting the URL directly doesn’t let you modify the iframe code, you’ll have to use JavaScript to wrap the iframe in a div. Here’s how to do it:
Add the following JavaScript code to the footer of your site:
window.addEventListener('DOMContentLoaded', function() {
  var iframes = document.querySelectorAll('iframe[data-src^="https://www.youtube.com/embed/"]');
  for (var i = 0; i < iframes.length; i++) {
    var iframe = iframes[i];
    var wrapper = document.createElement('div');
    wrapper.classList.add('youtube-wrapper');
    iframe.parentNode.insertBefore(wrapper, iframe);
    wrapper.appendChild(iframe);
  }
});
To add this script, use a theme option, a plugin like Code Snippets, or the Elementor Code option if you're using Elementor. Assign the script to run only on Blog Posts to avoid conflicts.
Now that the iframe is wrapped in a div with the class "youtube-wrapper," you can style it with CSS to adjust the size and ensure it stays responsive. Add the following CSS to the header:
Adjust the width and padding-bottom values as needed to fit your design. You may also need to add media queries to ensure the video adapts to different screen sizes, making it full-width on smaller screens.
Remember, it's important to clearly document your code with descriptive titles so other site admins understand its purpose. Keep this code separate from other scripts for better organization.
In conclusion, wrapping YouTube iframes in a div and using CSS to style them allows you to control the video size and ensure it looks good on all devices. This approach not only enhances the visual appeal of your site but also maintains a professional and user-friendly layout.
Google Analytics 4, often abbreviated as GA4, is the latest version of Google Analytics, a web analytics platform offered by Google. GA4 was officially announced in October 2020 and is designed to provide a more comprehensive and user-centric approach to tracking and analyzing user behavior on websites and mobile apps. Here are some key features and aspects of Google Analytics 4:
Event-based tracking: GA4 is built around an event-driven tracking model, which means it focuses on capturing and analyzing user interactions and events on your website or app. Events can include page views, button clicks, form submissions, video plays, and more. This approach allows for more flexible and detailed tracking of user behavior.
Enhanced user tracking: GA4 places a greater emphasis on tracking individual users across different devices and platforms. It uses a combination of user identifiers, such as user IDs and anonymous identifiers, to create a more holistic view of user journeys.
Improved reporting and analysis: GA4 offers a more intuitive and customizable reporting interface, making it easier to access and analyze data. It provides event-based reporting, allowing you to see how users engage with specific events and actions on your site.
Predictive metrics: GA4 includes predictive metrics that use machine learning to forecast future user behavior and trends, helping businesses make data-driven decisions.
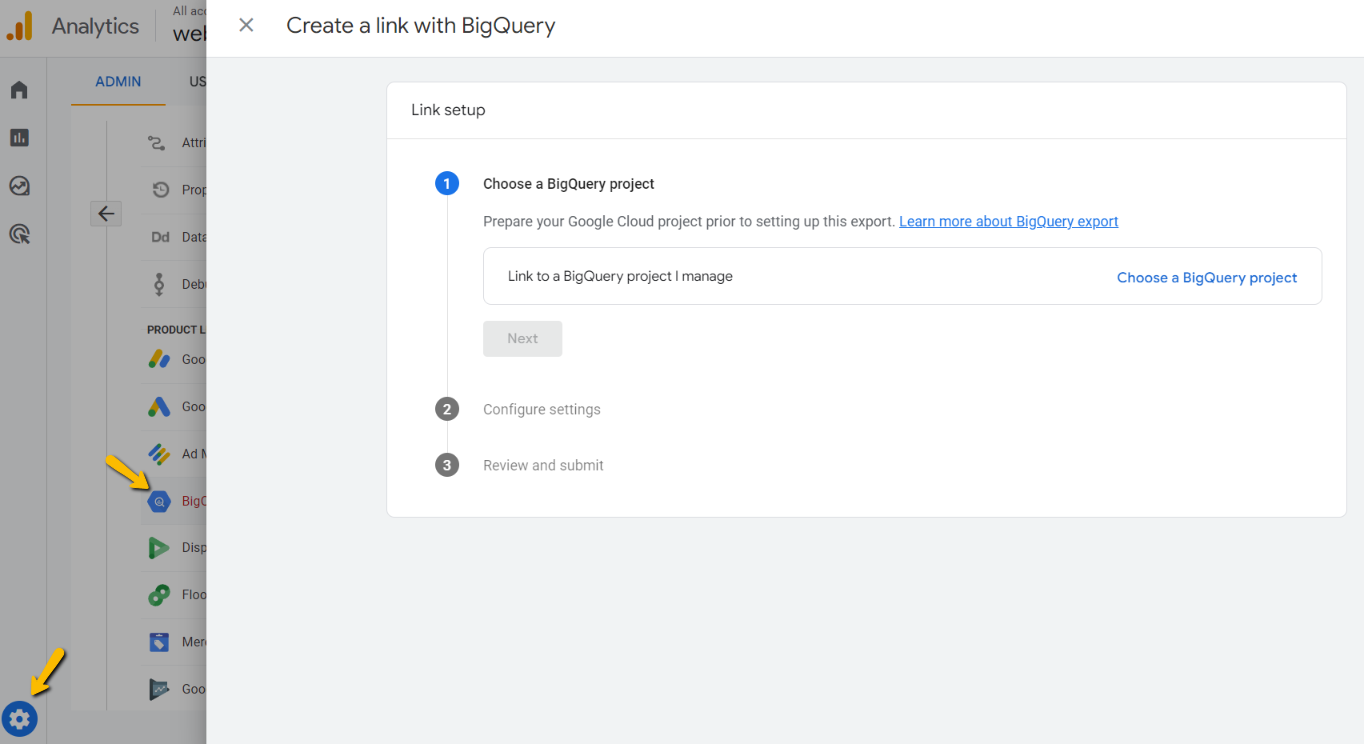
Integration with Google BigQuery: GA4 offers seamless integration with Google BigQuery, a powerful data warehouse and analytics platform. This allows for more advanced data analysis and customization.
Privacy-focused: Google Analytics 4 is designed with privacy in mind. It allows for more control over data collection and retention and includes features to help businesses comply with privacy regulations, such as GDPR and CCPA.
Cross-platform tracking: GA4 is designed to track user interactions across websites and mobile apps, providing a more unified view of user behavior regardless of the device or platform they use.
Event tagging and customization: Users can create custom events and event parameters, allowing for highly tailored tracking of specific actions and interactions on their websites or apps.
Audience building: GA4 includes advanced audience-building capabilities, making it easier to create and target specific user segments for marketing and remarketing purposes.
Real-time data: GA4 provides real-time reporting, enabling businesses to monitor user activity on their websites or apps as it happens.
While Google Analytics 4 is the latest version of the platform, Google continues to support Universal Analytics (the previous version). However, it is recommended that businesses and website owners transition to GA4 to take advantage of its enhanced features and capabilities, as Google is expected to focus its development efforts on GA4 in the future.
Should I still use the Universal Analytics?
Transition to GA4: Google has strongly encouraged users to start transitioning to GA4. While Universal Analytics still works, Google’s development efforts and new features are likely to be concentrated on GA4. If you want to take advantage of the latest analytics capabilities and features, it’s a good idea to start planning your transition to GA4.
Long-term viability: If you plan to use Google Analytics for the long term, it’s a good idea to transition to GA4 sooner rather than later. Google may eventually discontinue support for Universal Analytics, and you’ll want to ensure your analytics setup is up-to-date.
New features: GA4 offers several new features and capabilities, such as event-based tracking, predictive metrics, cross-platform tracking, and more detailed user journey analysis. If these features are important for your business or website, transitioning to GA4 would be beneficial.
Privacy compliance: GA4 is designed with privacy in mind and offers more robust privacy controls. If you need to comply with privacy regulations like GDPR or CCPA, GA4 might make it easier to manage data collection and user consent.
Customization: GA4 provides greater flexibility in event tracking and custom reporting. If you need a high level of customization and granularity in your analytics data, GA4 is a better choice.
Data continuity: If you transition from Universal Analytics to GA4, it’s important to plan for data continuity. Ensure that historical data is preserved and that you can still access the data you need for reporting and analysis.
Resource availability: Consider the resources and expertise available to you. Transitioning to GA4 might require changes to tracking implementations and reporting setups. Ensure you have the necessary skills or access to experts who can assist with the transition.
Conclusion
The decision to embrace Google Analytics 4 (GA4) sooner rather than later is not just a matter of keeping up with the times—it’s a strategic move that can significantly benefit your business or website. GA4 represents the future of web analytics, offering a wealth of advanced features and capabilities that can revolutionize the way you understand and leverage user data.
With event-based tracking, enhanced user tracking, predictive metrics, cross-platform tracking, and robust privacy controls, GA4 equips you with the tools needed to gain deeper insights into user behavior, adapt to evolving privacy regulations, and make data-driven decisions that propel your success.
Delaying the transition from Universal Analytics to GA4 may mean missing out on these valuable features and insights, as Google is expected to concentrate its development efforts on GA4 moving forward. So, the sooner you embark on this transition journey, the sooner you can harness the full power of GA4 to optimize your website or app’s performance, enhance user experiences, and ultimately achieve your digital goals.
In this rapidly evolving digital landscape, staying ahead of the curve with GA4 is not just an option; it’s a strategic imperative. Don’t wait—start planning your transition to Google Analytics 4 today and position your business for a more data-driven and successful future. To learn more about tips and tricks on how to use Google Analytics 4, click here.
FAQs
1. What is Google Analytics 4 (GA4) and why is it important?
Google Analytics 4 (GA4) is the latest version of Google’s web analytics platform. It’s crucial because it offers advanced features like event-based tracking, enhanced user tracking, predictive metrics, and more. GA4 is designed to provide a comprehensive understanding of user behavior and is the future of Google Analytics.
2. Is Universal Analytics still supported, and can I continue using it?
Yes, as of my last knowledge update in September 2021, Google was still supporting Universal Analytics (UA). You can continue using it. However, Google encourages transitioning to GA4 as they are likely to focus their development efforts on GA4 in the future.
3. What are the key benefits of transitioning to GA4 from Universal Analytics?
Transitioning to GA4 offers benefits like access to new features and capabilities, enhanced privacy compliance, more customization options, and the ability to track user interactions across various platforms. It’s essential for staying up-to-date and taking advantage of modern analytics tools.
4. How do I transition from Universal Analytics to GA4, and what should I consider?
Transitioning involves setting up a GA4 property, updating tracking codes, and ensuring data continuity. Consider factors like the long-term viability of your analytics setup, the need for new features, compliance with privacy regulations, and the availability of resources and expertise.
5. Can I keep my historical data when transitioning to GA4?
Yes, it’s possible to preserve historical data when transitioning to GA4. Google provides tools and guidelines to help migrate your existing data. It’s crucial to plan for data continuity to ensure you can still access and analyze your historical analytics data effectively.
Google Search Console is a free web service provided by Google that allows website owners, webmasters, and SEO professionals to monitor, manage, and optimize the presence of their websites in Google’s search results. Formerly known as Google Webmaster Tools, it was rebranded as Google Search Console in 2015.
This tool provides valuable insights and data about how Google’s search engine interacts with a website. It helps website owners understand how their site is performing in terms of search visibility, and it offers various tools and reports to improve the website’s search engine optimization (SEO) efforts. Some of the key features of Google Search Console include:
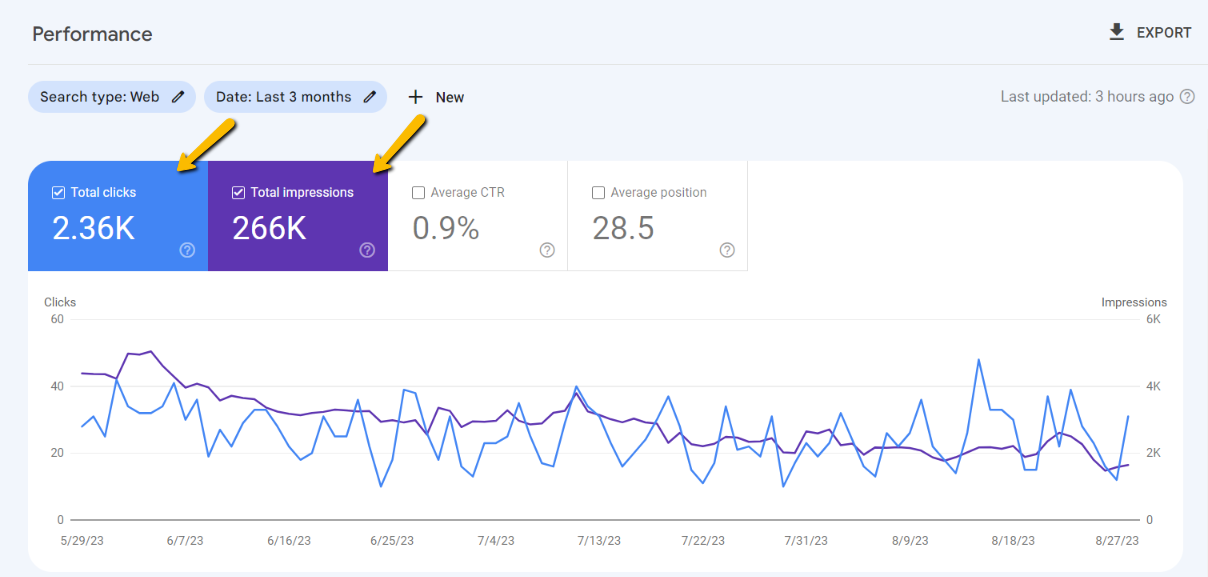
Performance Reports: These reports provide information about how often your site appears in Google search results, the number of clicks received, the click-through rate (CTR), and the average position of your site’s pages. This data helps you evaluate the effectiveness of your SEO efforts.
URL Inspection: This feature allows you to see how Google’s search engine sees a specific URL on your website. You can check if a particular page is indexed, view any indexing errors, and understand how Googlebot (Google’s web crawling bot) renders your page.
Index Coverage: This report provides insights into which of your site’s pages are indexed by Google and whether there are any issues that might be preventing certain pages from being indexed.
Sitemaps: You can submit a sitemap of your website to Google Search Console, which helps Google understand the structure of your site and index its pages more efficiently.
Mobile Usability: This report highlights any mobile usability issues on your site, helping you ensure that your website is user-friendly on various mobile devices.
Structured Data: Google Search Console allows you to check if your site is using structured data markup correctly. Structured data helps search engines understand the content on your pages better and can lead to enhanced search result features like rich snippets.
Security Issues: The tool can alert you to any security issues, such as malware or hacking attempts, that Google has detected on your site.
Manual Actions: If Google’s team identifies any violations of its webmaster guidelines on your site, it will provide details about the issue and steps to rectify it.
How can you make the most of Google Search Console’s features?
Using Google Search Console to its fullest extent involves utilizing its various features and reports to improve your website’s search performance, identify issues, and optimize your content for better visibility in search results. Here’s a step-by-step guide to making the most of Google Search Console:
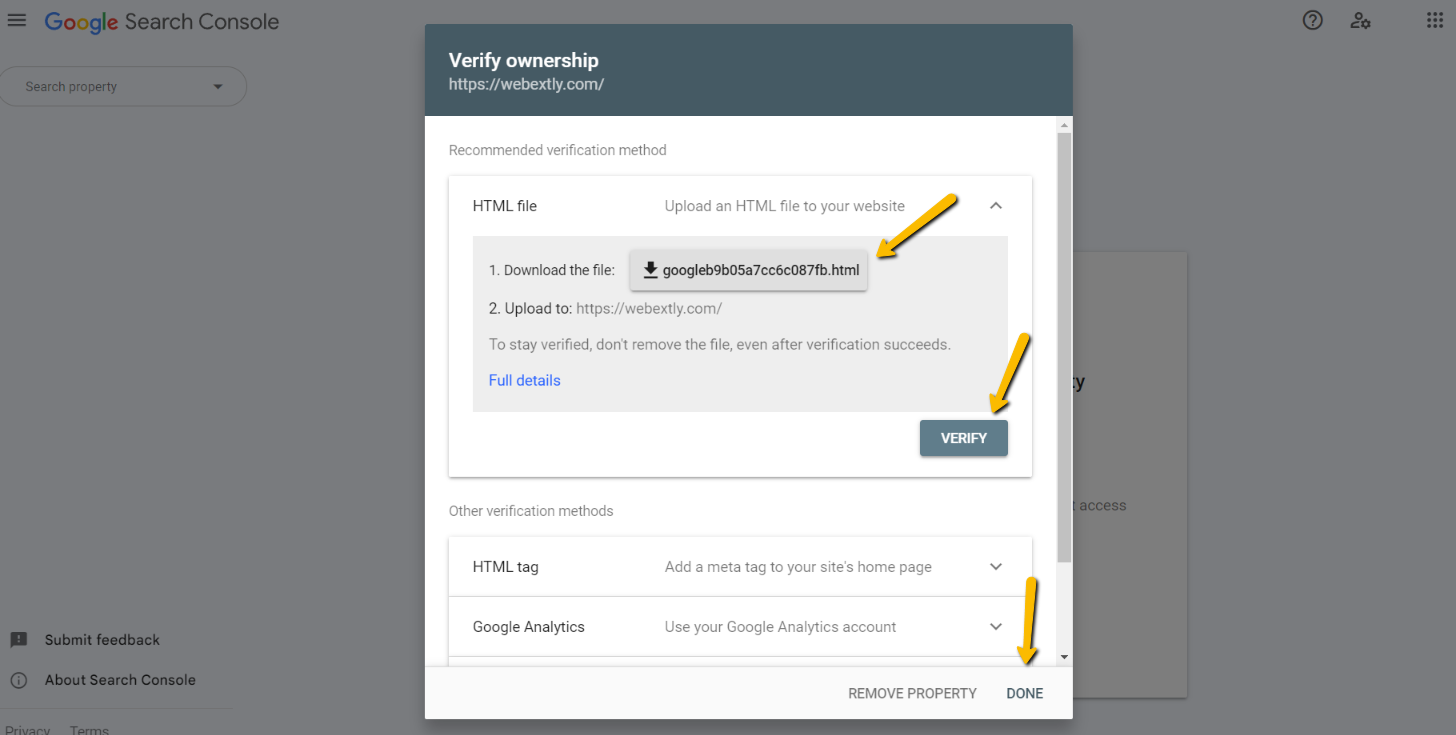
Verify Your Website: To start using Google Search Console, you need to verify ownership of your website. This can be done through various methods such as adding an HTML tag to your website’s code, uploading a verification file, or using Google Analytics.
Submit Sitemap: Once verified, submit your website’s sitemap to Google Search Console. A sitemap is a file that lists all the pages on your website, helping Google crawl and index your content more efficiently.
Monitor Performance Reports: Regularly check the Performance reports to understand how your site is performing in Google search results. Monitor metrics like clicks, impressions, click-through rate (CTR), and average position. Use this data to identify trends and areas for improvement.
Identify Top Performing Pages: Analyze the Performance reports to identify pages that receive the most clicks and impressions. Determine what makes these pages successful and apply those insights to other parts of your website.
Optimize Content: Use the queries report in the Performance section to see what search queries are driving traffic to your site. Identify high-impression, low-CTR queries and consider optimizing your content to improve your CTR.
Fix Index Coverage Issues: Regularly check the Index Coverage report to identify any issues with pages that are not being indexed or have indexing errors. Address these issues to ensure all your important pages are indexed.
Check Mobile Usability: Use the Mobile Usability report to identify and fix any mobile-related issues on your site. Google’s mobile-first indexing means that mobile usability is crucial for search rankings.
Monitor Manual Actions: Keep an eye on the Manual Actions report to see if Google has identified any violations of its guidelines on your site. If you receive a manual action, follow Google’s guidance to rectify the issues.
Test and Submit Changes: Use the URL Inspection tool to test how Googlebot renders specific pages on your site. This helps you ensure that your content is being properly understood by the search engine.
Use Structured Data: Implement structured data markup on your site to enhance search results with rich snippets. Use the Rich Results reports to see how Google is displaying your structured data in search results.
Set Up Alerts: Configure email alerts in Google Search Console to receive notifications about critical issues, such as indexing errors or security concerns, so you can address them promptly.
Regular Audits: Periodically conduct website audits using Google Search Console to catch new issues, monitor changes in performance, and stay up-to-date with any updates to the platform.
Stay Informed: Google Search Console offers guides, documentation, and announcements that provide insights into best practices and changes in search algorithms. Stay informed to adapt your strategies accordingly.
Remember that search engine optimization is an ongoing process, and Google Search Console is a valuable tool to assist you in continuously improving your website’s search performance. Regularly reviewing its features and reports, taking action on its recommendations, and staying updated with SEO trends will help you make the most of Google Search Console.
Google Analytics is an invaluable tool for anyone looking to gain insights into their website’s performance and audience behavior. Whether you’re a business owner, a marketer, or a website administrator, harnessing the power of Google Analytics can provide you with valuable data to make informed decisions and optimize your online presence. In this article, we will explore some expert tips and tricks that will help you make the most of Google Analytics like a pro.
1. Set Clear Goals
Before diving into Google Analytics, define your objectives and goals. What do you want to achieve with your website? Whether it’s increasing sales, driving traffic, or improving user engagement, having clear goals will help you set up the right tracking and measurement parameters.
2. Utilize Custom Dashboards
Google Analytics allows you to create custom dashboards, which provide a snapshot of the most important data for your business. Organize the information that matters most to you in one place, saving time and helping you access key insights quickly.
3. Master Segmentation
Segmentation is a powerful feature in Google Analytics that enables you to analyze specific subsets of your audience. By breaking down data into smaller, more targeted groups, you can uncover trends and patterns that may be overlooked in overall reports.
4. Track Website Conversions
Tracking conversions is crucial for understanding the effectiveness of your website in achieving its goals. Set up conversion tracking to monitor actions such as form submissions, purchases, or sign-ups. This data will help you identify areas for improvement in your conversion funnel.
5. Explore Behavior Flow
Understanding how visitors navigate your website is vital to optimize user experience. Behavior Flow in Google Analytics visually represents the path users take through your site, showing where they drop off or get stuck. Use this insight to enhance your website’s navigation and content flow.
6. Monitor Site Speed
Site speed significantly impacts user experience and search engine rankings. Google Analytics provides data on page load times, giving you the opportunity to identify and rectify any slow-loading pages that may be affecting user engagement.
7. Learn from Site Search Data
If your website has a search function, analyzing site search data can provide valuable insights into what your audience is looking for. Use this information to improve content, identify new topic ideas, and address any gaps in your website’s navigation.
8. Leverage Real-Time Reports
Google Analytics offers real-time reports that show you what’s happening on your website at any given moment. This feature is especially useful for tracking the impact of marketing campaigns or monitoring the success of live events.
9. Understand Referral Traffic
Knowing where your traffic comes from is essential to assess the effectiveness of different marketing channels. Utilize the “Referral Traffic” report in Google Analytics to identify which sources are driving the most valuable visitors to your site.
10. Create Custom Alerts
Stay on top of critical changes by setting up custom alerts in Google Analytics. Whether it’s a sudden drop in traffic or a surge in conversions, these alerts will notify you of significant events, allowing you to respond promptly.
11. Use Annotations
Annotations in Google Analytics enable you to add notes to specific dates on your reports. Utilize this feature to mark significant events, such as website updates, marketing campaigns, or product launches. These annotations will help you understand trends and correlations in your data.
12. Optimize for Mobile
With mobile usage on the rise, it’s crucial to ensure your website performs well on smartphones and tablets. Use Google Analytics’ mobile reports to assess mobile traffic, user behavior, and conversion rates. Optimize your site for mobile to enhance user experience and engagement.
13. Stay Updated with Google Analytics Academy
Google Analytics Academy offers free online courses to help you master the platform’s features. From beginner to advanced topics, these courses provide valuable insights and best practices to make the most of Google Analytics.
14. A/B Testing for Continuous Improvement
A/B testing allows you to compare two versions of a web page to see which performs better. Use this technique to optimize landing pages, call-to-action buttons, or content layout continually. Continuous improvement based on data-driven decisions is key to success.
15. Review and Analyze Reports Regularly
Lastly, consistently review and analyze your Google Analytics reports. Regular monitoring will help you identify trends, spot potential issues, and capitalize on new opportunities. Data-driven decisions lead to more effective strategies and improved website performance.
Conclusion
By implementing these top tips and tricks, you can take your Google Analytics proficiency to the next level. Remember to set clear goals, use segmentation, track conversions, and leverage various features to gain valuable insights into your website’s performance and audience behavior.
FAQs
1. Is Google Analytics free to use?
Yes, Google Analytics offers a free version that provides robust website analytics features. However, there is also a premium version, Google Analytics 360, which caters to enterprise-level businesses with advanced capabilities.
2. Can I use Google Analytics for mobile apps?
Yes, Google Analytics can be integrated into mobile apps to track user interactions, in-app behavior, and other relevant data. The process involves implementing the Google Analytics SDK and setting up tracking parameters.
3. How often should I review my Google Analytics reports?
The frequency of reviewing reports depends on your website’s traffic volume and the nature of your business. For most websites, a weekly or monthly review should suffice, but high-traffic sites may benefit from more frequent analysis.
4. Can Google Analytics help me identify my most popular content?
Absolutely! Google Analytics provides data on page views, time spent on page, and other engagement metrics. By analyzing this data, you can identify which content resonates most with your audience.
5. Is Google Analytics compliant with data privacy regulations?
Yes, Google Analytics allows you to enable data privacy settings and comply with various regulations, such as GDPR (General Data Protection Regulation). Ensure you configure these settings correctly to protect user data and meet legal requirements.
In this comprehensive guide, we will explore WordPress website maintenance tips. If you own or manage a WordPress website, you know how crucial it is to keep it running smoothly, securely, and effectively. Regular maintenance is the key to ensuring your site remains up-to-date, secure from potential threats, and provides an optimal user experience. In this guide, we will walk you through essential WordPress website maintenance tips that are easy to implement, even if you’re not a tech expert. Whether you’re a seasoned WordPress user or just starting, these tips will help you keep your website in top-notch condition, allowing you to focus on creating valuable content and engaging with your audience. Let’s dive in and learn how to take care of your WordPress website like a pro!
Regular Backups: Make sure to schedule regular backups of your WordPress website. Backups are like safety nets that keep recent copies of your site’s data, files, and content in case something goes wrong.
Keep Everything Updated: Stay on top of updates for your WordPress core, themes, and plugins. Updates often include important fixes and security patches that help protect your website from potential vulnerabilities.
Secure Your Website: Take some simple security measures to protect your website from hackers and malicious attacks. Use strong passwords, limit login attempts, and consider installing security plugins to add an extra layer of protection.
Clean Up Unused Stuff: It’s essential to remove any themes and plugins that you no longer use or need. Unused or outdated plugins can cause problems and even expose your site to security risks.
Keep an Eye on Performance: Check how your website is performing regularly. Slow-loading sites can frustrate visitors and may affect your site’s search engine rankings. Optimize your site to make it faster and more enjoyable for users.
Optimize Your Database: Your website’s database can get cluttered over time. Cleaning and optimizing it will improve your site’s performance and keep things running smoothly.
Fix Broken Links: Broken links can be annoying for visitors and may hurt your site’s SEO. Regularly scan for broken links and take the time to fix or redirect them.
Moderate Comments: Keep your website’s comment section in check by moderating comments regularly. This helps prevent spam and maintains a positive and engaging discussion environment.
Secure User Accounts: Make sure all user accounts on your site have strong passwords. Also, only grant necessary access levels to minimize the risk of unauthorized access.
Analyze Traffic: Use tools like Google Analytics to understand your website’s traffic and user behavior. Analyzing this data can help you make informed decisions about your site’s content and marketing strategies.
Keep Content Fresh: Keep your website content up to date. Outdated information can confuse visitors and discourage them from returning.
Check Responsiveness: Ensure that your website looks good and works well on various devices and browsers. Test its responsiveness regularly.
Monitor Uptime: Use website monitoring tools to check your site’s uptime. Frequent downtime can harm your site’s reputation and SEO.
Backup Before Making Changes: Always create a backup of your website before making significant changes, such as updating themes or plugins or modifying the site’s code. This precaution ensures you can restore your site if anything goes wrong.
By following these WordPress website maintenance tips, you can ensure that your website remains secure, performs well, and provides an excellent user experience to your visitors.
Securing your WordPress site is crucial to protect it from potential cyber threats. Here are several ways to ensure the cybersecurity of your WordPress site:
Keep WordPress Updated
Staying up to date with the latest version of WordPress is crucial for maintaining a secure and reliable website. By consistently using the most recent version and keeping it updated, you can enhance the overall security and protect your site from potential vulnerabilities.
WordPress, being a popular and widely used content management system (CMS), regularly releases updates that address security issues and bug fixes. These updates are designed to counteract known vulnerabilities, improve performance, and introduce new features. Failing to update your WordPress installation may leave your website susceptible to security breaches, making it an easy target for hackers and malicious attacks.
To ensure the safety of your website and its data, it is important to understand the importance of updating WordPress. By regularly checking for updates and applying them promptly, you are effectively equipping your site with the latest security patches. These patches act as preventive measures, safeguarding your website from potential threats and exploits.
Additionally, staying current with WordPress updates also allows you to take advantage of the latest features and improvements introduced by the development team. These updates often include enhancements to user experience, performance optimizations, and new functionalities that can benefit your website’s overall performance and user engagement.
By prioritizing the use of the latest version of WordPress and consistently updating it, you demonstrate a proactive approach towards website security. This practice reduces the risk of encountering security vulnerabilities and ensures a more stable and reliable online presence. So, make it a habit to regularly check for updates and apply them promptly to maintain the integrity and security of your WordPress-powered website.
Use Secure Hosting
Selecting a reputable and secure hosting provider is a critical step in ensuring the stability and security of your WordPress site. When choosing a hosting provider, it is essential to prioritize those that offer robust security measures, regular backups, and automatic updates.
A reputable hosting provider will have a solid track record of providing secure hosting services. They will employ various security measures, such as firewalls, intrusion detection systems, and malware scanning, to protect your website from unauthorized access and potential threats. Additionally, they will have protocols in place to promptly address any security incidents and ensure the safety of your data.
Regular backups are crucial for safeguarding your website’s data and content. A reliable hosting provider will offer automated backup solutions, which allow you to restore your site to a previous state in the event of data loss or a security breach. Regular backups provide an extra layer of protection and peace of mind, ensuring that you can recover your site quickly and easily if necessary.
Automatic updates are another important feature to consider when selecting a hosting provider for your WordPress site. Hosting providers that offer automatic updates ensure that your WordPress installation, themes, and plugins are always up to date with the latest security patches and bug fixes. This minimizes the risk of vulnerabilities and helps maintain a secure website environment.
Furthermore, a reputable hosting provider will provide excellent customer support. They will have a responsive support team available to assist you with any technical issues or security concerns that may arise. Prompt and reliable customer support can make a significant difference in resolving problems quickly and minimizing downtime.
When evaluating hosting providers, take the time to research their reputation, read customer reviews, and compare their security features, backup policies, and update practices. Look for providers that have a proven track record of delivering secure and reliable hosting services for WordPress sites. By choosing a reputable and secure hosting provider, you can establish a strong foundation for your website’s security and ensure a smooth online experience for your visitors.
Strong Passwords
Free cyber security concept background, public domain CC0 photo.
Maintaining strong and unique passwords for your WordPress admin account, FTP (File Transfer Protocol), and database is vital to safeguarding the security of your website. It is crucial to avoid using common passwords or easily guessable combinations to mitigate the risk of unauthorized access. To enhance password security, consider utilizing a password manager to generate and securely store complex passwords.
When creating passwords for your WordPress admin account, FTP, and database, follow these best practices:
Complexity: Craft passwords that are a combination of uppercase and lowercase letters, numbers, and special characters. The more complex your passwords are, the harder they are to crack.
Length: Opt for longer passwords, as they are generally more secure. Aim for a minimum of 12 characters or more.
Uniqueness: Avoid reusing passwords across different platforms or accounts. Each password should be unique to reduce the impact of a potential data breach.
Avoid Personal Information: Refrain from incorporating personal information, such as your name, birthdate, or address, into your passwords. This information is easily accessible and can be exploited by attackers.
Password Manager: Consider using a password manager application to generate and store complex passwords securely. Password managers offer the convenience of remembering passwords for you while providing an extra layer of encryption to protect your sensitive information.
Regularly updating your passwords is also important. Aim to change them every few months or immediately if there is a security incident or suspicion of compromise. By regularly refreshing your passwords, you reduce the likelihood of unauthorized access and maintain a higher level of security.
Educating yourself and your team members on password security practices is crucial. Ensure that everyone involved understands the importance of using strong, unique passwords and the potential risks associated with weak passwords.
By implementing these password security measures, you significantly enhance the security of your WordPress site, protecting it from unauthorized access and potential data breaches.
Limit Login Attempts
Member Log in Membership Username Password Concept
Installing a plugin that restricts the number of login attempts is an effective measure to prevent brute-force attacks on your WordPress site. This plugin helps thwart unauthorized access by blocking repeated failed login attempts originating from the same IP address.
Brute-force attacks involve automated scripts or tools that systematically try various username and password combinations until they gain access to your website’s admin area. By limiting the number of login attempts allowed, you can mitigate the risk of these malicious attempts and enhance your site’s security.
When selecting a plugin for limiting login attempts, consider the following factors:
Reputation: Choose a plugin from a reputable source or a trusted plugin repository. Read user reviews and check the plugin’s update frequency to ensure it is well-maintained and reliable.
Functionality: Look for a plugin that offers features like configurable login attempt limits, customizable lockout periods, and IP blocking options. These features allow you to tailor the plugin’s settings to your specific security needs.
Compatibility: Ensure that the plugin is compatible with your WordPress version and other installed plugins. Compatibility issues could potentially impact your site’s functionality or security.
Once you install and activate the plugin, you can typically configure the login attempt settings from the plugin’s settings page. Set a reasonable limit for the number of failed login attempts before a block is imposed. This limit should strike a balance between security and usability, avoiding unnecessary lockouts for legitimate users who may mistype their credentials.
When an IP address exceeds the specified limit, the plugin will automatically block further login attempts from that IP. This proactive measure helps protect your website from brute-force attacks, as the attacker’s IP is effectively barred from making additional login attempts.
Regularly monitor the plugin’s logs and reports to stay informed about blocked IP addresses and potential security threats. If you notice any suspicious activity, take appropriate action, such as banning IP addresses or implementing additional security measures.
By installing a login attempt limiting plugin, you reinforce the security of your WordPress site by mitigating the risk of brute-force attacks. This simple yet effective measure adds an extra layer of protection, reducing the likelihood of unauthorized access to your website’s admin area.
Two-Factor Authentication (2FA)
By implementing two-factor authentication (2FA) for your WordPress login, you can add an additional layer of security to your website. This enhanced security feature requires users to complete a second verification step, such as entering a code sent to their mobile device, in addition to providing their password.
Enabling 2FA significantly strengthens the authentication process, making it more difficult for unauthorized individuals to gain access to your WordPress admin area. Even if someone manages to obtain or guess your password, they would still need the secondary verification code to proceed further.
To implement 2FA in WordPress, you can utilize various plugins available in the WordPress plugin repository. These plugins typically integrate with popular 2FA methods, such as SMS codes, authenticator apps, or email verification. Choose a reputable and well-supported plugin that aligns with your preferred 2FA method.
Once you install and activate the 2FA plugin, you can configure the settings to enable the desired verification method. This may involve setting up SMS codes, generating QR codes for authenticator apps, or enabling email verification.
When a user attempts to log in, they will be prompted to enter the secondary verification code after providing their username and password. This code is typically time-sensitive and requires immediate entry to proceed. By using 2FA, you add an extra hurdle for potential attackers, making it significantly more challenging to gain unauthorized access.
It is important to note that implementing 2FA may require some additional setup steps, such as registering your mobile device with the authentication method you choose. However, the added security benefits far outweigh the minor inconvenience of the setup process.
Enabling two-factor authentication for your WordPress login is a highly recommended security measure. It adds an extra layer of protection by requiring a secondary verification step, ensuring that only authorized individuals with both the correct password and the additional verification code can access your WordPress admin area. By implementing 2FA, you enhance the security of your website and reduce the risk of unauthorized access or potential data breaches.
Use Secure Plugins and Themes
When it comes to installing plugins and themes for your WordPress site, it is crucial to only source them from trusted and reputable sources, such as the official WordPress repository. By doing so, you can minimize the risk of introducing malicious code or vulnerabilities to your website.
The official WordPress repository carefully reviews and monitors the plugins and themes available on their platform, ensuring they meet quality and security standards. These vetted resources have undergone scrutiny, making them a reliable choice for your website.
Furthermore, it is essential to keep your installed plugins and themes up to date. Developers frequently release updates that address security vulnerabilities, bug fixes, and compatibility issues. By regularly updating your plugins and themes, you ensure that you have the latest security patches and improvements, reducing the risk of exploitation.
To maintain a secure environment, it is advisable to remove any unused plugins and themes from your WordPress installation. Unused plugins and themes may become outdated, making them potential targets for attacks. By removing them, you minimize the potential vulnerabilities and streamline the performance of your website.
When selecting plugins and themes, consider factors such as the developer’s reputation, the number of active installations, user reviews, and the frequency of updates. These indicators can help gauge the reliability and security of the resources you are considering.
Additionally, exercise caution when installing plugins or themes from third-party sources. Only obtain them from trusted developers and reputable marketplaces. Be vigilant and carefully review any additional code, permissions, or functionality offered by these sources to avoid potential security risks.
By following these practices – installing plugins and themes from trusted sources, regularly updating them, and removing unused resources – you contribute to a more secure WordPress environment. By minimizing potential vulnerabilities, you enhance the overall security of your website, protecting it from potential exploits and ensuring a safer online experience for both you and your visitors.
Secure File Permissions
Secure data file folder with ring code lock icon. Flat 3d isometry isometric web vector illustration.
Setting the appropriate file permissions for your WordPress files and directories is an essential step in maintaining the security and integrity of your website. By properly configuring file permissions, you can restrict write access to critical files and folders, minimizing the risk of unauthorized modifications.
File permissions control who can read, write, and execute files on your server. In the context of WordPress, there are recommended permissions for different files and directories. Here are some best practices:
Directories: Set directory permissions to 755 (or drwxr-xr-x). This allows the owner to have full control, while group and others can only read and execute.
Files: Set file permissions to 644 (or -rw-r–r–). This grants the owner read and write access, while group and others can only read.
wp-config.php: Set permissions for this file to 600 (or -rw——-). This ensures that only the owner can read and modify the file, providing an extra layer of security for your database credentials and other sensitive information.
Plugins and themes: Set permissions for plugin and theme files to 644 (or -rw-r–r–). This prevents unauthorized modifications while still allowing WordPress to access and use these files.
Uploads folder: Set permissions for the uploads folder (wp-content/uploads) to 755 (or drwxr-xr-x). This allows the web server to write files to the folder, while restricting others from modifying its contents.
It is important to note that different server configurations and hosting providers may have variations in file permissions requirements. Consult your hosting provider’s documentation or support team for specific guidance related to file permissions.
Regularly reviewing and adjusting file permissions is crucial, especially after installing new plugins or themes or making changes to your WordPress installation. Incorrect file permissions can potentially expose your website to security risks, making it easier for malicious actors to exploit vulnerabilities.
By properly setting file permissions and restricting write access to critical files and directories, you strengthen the security posture of your WordPress site. This helps safeguard against unauthorized modifications and protects your website from potential breaches and malicious activities.
Secure Your wp-config.php File
Safeguarding the wp-config.php file is crucial for protecting sensitive information, including your database credentials, within your WordPress installation. To enhance its security, consider moving the wp-config.php file to a higher-level directory or implementing server configuration rules to deny direct access.
By default, the wp-config.php file resides in the root directory of your WordPress installation. However, you can move it to a directory outside the publicly accessible web root. This ensures that the file is not directly accessible via a web browser, reducing the risk of unauthorized access.
To move the wp-config.php file, follow these steps:
Create a new directory outside the web root, preferably at the same level or higher.
Open the wp-config.php file using a text editor.
Look for the line that defines the ABSPATH constant, which specifies the file’s location. It should look similar to this: define('ABSPATH', dirname(__FILE__) . '/');.
Modify the line to point to the new directory where you created the secure location. For example, if you created a directory named “secure” at the same level, the modified line would be: define('ABSPATH', dirname(__FILE__) . '/../secure/');.
Save the changes to the wp-config.php file.
Ensure that the new directory has the appropriate file permissions (e.g., 700 or drwx——) to restrict access.
Alternatively, if you cannot move the wp-config.php file to a higher-level directory, you can add server configuration rules to deny direct access to it. This is typically done by modifying the web server’s configuration files, such as .htaccess for Apache or web.config for IIS.
To deny direct access using server configuration rules, consult your hosting provider’s documentation or seek assistance from your server administrator. The rules may involve denying access to specific file names or using rewrite rules to redirect requests away from the wp-config.php file.
By protecting the wp-config.php file, you safeguard sensitive information and reduce the risk of potential security breaches. Whether by moving it to a higher-level directory or using server configuration rules, these measures ensure that the file is not directly accessible to unauthorized parties.
Implement a Web Application Firewall (WAF)
Hacker cracking the binary code data security
Installing a Web Application Firewall (WAF) plugin or utilizing a firewall service is an effective way to filter and block malicious traffic on your WordPress site. A WAF acts as a protective barrier between your website and potential attackers, helping to detect and block suspicious requests or known attack patterns.
There are several options available for implementing a WAF:
WAF Plugin: Install a reputable WAF plugin from the official WordPress repository or a trusted source. These plugins typically offer features such as request filtering, IP blocking, and protection against common attack vectors like SQL injection and cross-site scripting (XSS). Regularly update the plugin to ensure you have the latest security enhancements.
Firewall Service: Consider using a firewall service that specializes in web application security. These services operate outside of your server and provide advanced filtering capabilities. They often employ machine learning algorithms and threat intelligence to identify and block malicious traffic before it reaches your website. Some popular firewall services include Cloudflare, Sucuri, and Incapsula.
When using a WAF, it analyzes incoming traffic and compares it against a set of rules and patterns associated with known attacks. If a request is flagged as suspicious or matches a known attack pattern, the WAF takes appropriate action, such as blocking the request or presenting a CAPTCHA challenge to verify the user’s legitimacy.
WAFs can help protect your website from a variety of attacks, including brute-force attempts, DDoS attacks, and code injection attacks. They provide an additional layer of defense, complementing other security measures you have in place.
However, it’s important to note that a WAF is not a foolproof solution and should not be considered as the sole security measure. It is still crucial to keep your WordPress installation, plugins, and themes up to date, implement strong passwords, and follow other security best practices.
By installing a WAF plugin or utilizing a firewall service, you add an extra layer of protection to your WordPress site. This helps filter and block malicious traffic, reducing the risk of successful attacks and ensuring a safer browsing experience for your visitors.
Regular Backups
Regularly backing up your WordPress site and securely storing the backups is a critical practice for ensuring the safety and recoverability of your website. In the event of a security breach or any unexpected issues, having recent backups enables you to restore your site to a clean and functional state.
Here are some guidelines for backing up your WordPress site effectively:
Frequency: Establish a regular backup schedule that aligns with your website’s update frequency. For frequently updated sites, daily or real-time backups are recommended. For less frequently updated sites, weekly or bi-weekly backups may suffice.
Complete Backups: Ensure that your backups encompass all the essential components of your site, including files, databases, themes, plugins, media files, and any custom modifications. A comprehensive backup guarantees that you can fully restore your site with all its functionalities intact.
Off-site Storage: Store your backups in a secure location separate from your live website. Off-site storage prevents data loss in case of server failures, hacking incidents, or physical damage. Cloud storage services, remote servers, or dedicated backup solutions are suitable options.
Encryption and Access Control: Encrypt your backups to protect the sensitive data contained within them. Implement access controls to restrict the backup files’ accessibility to authorized personnel only.
Testing Restorations: Regularly test the restoration process to ensure that your backups are functional and can be successfully restored if needed. Performing test restores helps identify any potential issues or inconsistencies in your backup files.
Automated backup plugins and services are available for WordPress, simplifying the backup process and scheduling. Popular plugins include UpdraftPlus, BackupBuddy, and Jetpack’s Backup feature. These tools offer customizable backup options and facilitate easy restoration when required.
Remember, backups are not a substitute for robust security measures but serve as an essential safety net. Alongside regular backups, implement other security practices such as using strong passwords, keeping your WordPress core and plugins up to date, and employing security plugins to minimize potential vulnerabilities.
By diligently backing up your WordPress site and securely storing the backups, you ensure the ability to recover from security breaches, data loss, or website issues. This practice provides peace of mind and allows you to quickly restore your site to a clean state, minimizing any potential downtime or disruption.
SSL/TLS Encryption
Utilizing SSL/TLS certificates is crucial for encrypting data transmitted between your WordPress site and visitors’ browsers. This security measure is particularly vital when it comes to safeguarding sensitive information, including login credentials, personal data, and payment details.
SSL (Secure Sockets Layer) and its successor TLS (Transport Layer Security) protocols establish a secure connection by encrypting data in transit. This encryption ensures that the information exchanged between your website and visitors’ browsers remains confidential and protected from unauthorized access.
To implement SSL/TLS on your WordPress site, follow these steps:
Obtain an SSL/TLS Certificate: Acquire an SSL/TLS certificate from a trusted certificate authority (CA). You can obtain a certificate through your web hosting provider, purchase one from a reputable CA, or use a free certificate service like Let’s Encrypt.
Install the Certificate: Once you have the certificate, follow the instructions provided by your hosting provider or CA to install it on your web server. Some hosting providers offer automatic installation options or tools to streamline the process.
Update Website URLs: After installing the certificate, update your WordPress settings to ensure all website URLs start with “https://” instead of “http://”. This ensures that visitors are automatically redirected to the secure version of your site.
Test the SSL/TLS Configuration: Verify that your SSL/TLS setup is functioning correctly using online tools or browser extensions. This ensures that the secure connection is established and visitors’ browsers display the padlock icon to indicate a secure connection.
By enabling SSL/TLS on your WordPress site, you provide a secure browsing experience for your visitors. The encryption protects sensitive information from eavesdropping, tampering, or interception by malicious actors. This is especially important for websites that handle login credentials, user data, or online transactions.
Additionally, using SSL/TLS has additional benefits, such as improving your site’s credibility and search engine rankings. Many browsers now flag websites without SSL/TLS as “Not Secure,” potentially discouraging visitors from interacting with your site.
By prioritizing the implementation of SSL/TLS certificates on your WordPress site, you reinforce the security and privacy of your visitors’ data. This practice demonstrates your commitment to protecting sensitive information and builds trust with your audience.
Monitor and Audit
Monitoring your site’s activity logs is an important security practice to proactively detect and respond to any suspicious or unauthorized activities on your WordPress site. By regularly reviewing your site’s security logs and audit logs, you can identify potential security issues and take appropriate measures to mitigate them.
Here are some key steps to effectively monitor your site’s activity logs:
Enable Logging: Ensure that your WordPress site has logging functionality enabled. This can be achieved through security plugins or server configurations. Logging captures various activities and events occurring on your site, such as login attempts, plugin installations, content modifications, and more.
Review Logs Regularly: Dedicate time to review your site’s security logs and audit logs on a periodic basis. This can be done weekly or monthly, depending on the size and activity level of your site. Look for any suspicious patterns, unauthorized access attempts, or unexpected activities that deviate from normal behavior.
Use Security Plugins: Consider using security plugins that offer comprehensive logging and monitoring capabilities. These plugins can provide detailed logs and alerts for various security-related events. Some popular security plugins include Sucuri, Wordfence, and iThemes Security.
Pay Attention to Failed Login Attempts: Monitor your site’s logs for repeated failed login attempts, especially from unusual IP addresses. Multiple failed login attempts could indicate brute-force attacks or unauthorized access attempts. Take immediate action by blocking the suspicious IP addresses or implementing additional security measures.
Stay Updated on Security Alerts: Keep yourself informed about the latest security vulnerabilities, exploits, and recommended security practices for WordPress. Subscribe to security newsletters, follow reputable security blogs, and participate in relevant forums or communities to stay up to date. This knowledge will help you identify potential security risks and take preventive measures.
Implement Intrusion Detection Systems (IDS): Consider using intrusion detection systems or security plugins that can detect and alert you about suspicious activities, known attack patterns, or unauthorized changes to files or code. These systems provide an additional layer of security by actively monitoring your site’s behavior and identifying potential threats.
By actively monitoring your site’s activity logs, you can quickly identify and respond to potential security threats. This proactive approach allows you to take timely actions, such as blocking suspicious IPs, strengthening passwords, or updating vulnerable plugins, to maintain a secure WordPress environment. Regularly reviewing your logs demonstrates your commitment to site security and helps safeguard your website and its data from unauthorized access or malicious activities.
Educate Yourself and Users
Staying informed about the latest security best practices for WordPress is essential to maintaining a secure website. By continuously educating yourself and your users on topics such as phishing, password security, and safe browsing habits, you can actively mitigate potential security risks. Here are some key points to consider:
Phishing Awareness: Educate yourself and your users about phishing attacks, which involve deceptive tactics to trick individuals into revealing sensitive information. Teach them to be cautious of suspicious emails, messages, or websites that attempt to gather personal data or login credentials. Encourage them to verify the authenticity of requests before sharing any sensitive information.
Strong Passwords: Emphasize the importance of using strong, unique passwords for WordPress accounts. Instruct users to avoid common passwords, dictionary words, or personal information that can be easily guessed. Encourage them to use a combination of uppercase and lowercase letters, numbers, and special characters. Consider implementing a password policy that enforces complexity and regular password changes.
Safe Browsing Habits: Promote safe browsing practices, such as avoiding clicking on suspicious links or downloading files from untrusted sources. Encourage the use of reputable antivirus software and browser extensions that provide protection against malicious websites and phishing attempts. Remind users to always verify the authenticity and security of websites before sharing any sensitive information.
Update Awareness: Stress the importance of regularly updating WordPress core, themes, and plugins. Inform users about the significance of updates, which often include security patches and bug fixes. Encourage them to enable automatic updates whenever possible or establish a routine for manual updates.
User Permissions: Educate users about the importance of assigning appropriate user roles and permissions within WordPress. Advise them to grant the minimum level of access necessary for each user, reducing the risk of unauthorized modifications or data breaches.
Security Plugins: Introduce users to reputable security plugins available for WordPress. Inform them about the benefits of using plugins that provide features such as malware scanning, firewall protection, and login security enhancements. Help them understand how these plugins can enhance the overall security of their websites.
Ongoing Education: Keep yourself and your users informed about the latest security trends, vulnerabilities, and best practices. Encourage regular training sessions, workshops, or resources that provide up-to-date information on WordPress security. Engage with reputable security communities or forums to stay informed and share knowledge.
By fostering a culture of security awareness and ongoing education, you empower yourself and your users to actively participate in maintaining a secure WordPress environment. Together, you can effectively mitigate potential risks and ensure the protection of your website and sensitive data.
By following these practices, you can significantly enhance the cybersecurity of your WordPress site and reduce the risk of cyber threats.